
User's Manual
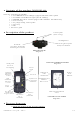
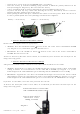
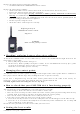
Table Of Contents

Remove the old battery(ies) and replace it(them):
- 1 3-V Lithium CR2 for the CANICOM 400 remote control
Replace the battery(ies) as follows:
▪ On the back of the remote control, unscrew the screw and remove the battery cover.
▪ Remove the old battery(ies) using the special tab.
▪ Insert the new battery(ies)
paying attention to follow polarity indicated on the battery
housing. For CANICOM 400, a tab is under the battery.
▪ Put the lid back in place. For CANICOM 400, make sure the tab is in correct position (inside the
battery housing) to maintain water tightness.
▪ Put the top back, using the screw.
▪ Check the remote control operates correctly.
Replacing battery of
CANICOM 400 remote control
Diagram 9
WARNING
Make sure the polarity is correct
● Checking/replacing battery of receiver collar(s)
To check the condition of the receiver collar battery, observe the On/Off indicator light located on the
front of the receiver collar:
9 Battery fully charged: flashes slow green
9 Weak battery: flashes quickly red. Replace it with a new 3 Volt Lithium CR 2 battery (See § First
use from new: fitting the battery in the receiver collar(s))
Check the receiver collar operates correctly.
● Changing the contact points
Two different series of contact points are supplied. The length of the contact points must be sufficient to
have proper contact with the dog’s skin, enabling the device to operate correctly.
If you have a long-haired dog and the short contact points fitted to the collar in the factory are
inadequate, remove and replace them with the long ones supplied with the kit.
Carefully tighten them manually (do not use any key).
● How to check that your CANICOM 400 is functioning properly
You can check that your CANICOM 400 is operating correctly at any time.
▪ Before doing so, make sure that the receiver collar is turned “off”.
▪ Place the neon test lamp in contact with each of the contact points (by unscrewing them then by
screwing them up in order to grip wires of the lamp under the contact points).
▪ Turn “on” the remote control and receiver collar you want to test.
▪ Select the receiver collar you want to test on the remote control:
9 Press the A or B key in order to select the collar (the letter A or B will appear on the LCD screen).
9 Press the “F” or “C” button and modify the level of intensity of the stimulations: the test lamp will
come on with more or less intensity.
Renew the same procedure for each receiver collar you want to test.
● Getting the best results
CANICOM 400 – user-s guide – indice A 8/12