
2.0


4–50 Pagis Pro User’s Guide
Contents Index
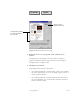
4. Click the Scan icon on the Pagis ToolBar to display the
Scan Tool’s Scanner tab (refer to Figure 4–15).
5. On the Scan Tool’s Scanner tab, select Photograph as the
page type of the incoming image.
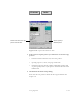
6. Optionally, click the Properties button to fine-tune
settings for the incoming image.
For example, you might want to turn on or off some of the page
refinement settings. Additionally, you might want to specify a file
name and location for the photograph. Finally, you might want to
add keyword search properties for the photograph.
Refer to a previous section, “Changing default properties for
scanned documents,” for complete information.
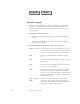
7. Specify Save and Close options on the Scan Tool.
Click the Auto Save checkbox off to display a standard Save As
dialog box when scanning is complete. Otherwise the document is
saved automatically to the default file name and location defined
in Auto Save properties.
Click the Close when done option off if you want the Scan Tool
to remain open after you finish scanning a document.
8. Download the photograph(s) from your digital camera to
Pagis Pro.
• Click the Scan button on the Scan Tool’s Scanner tab. This
displays the digital camera’s TWAIN interface. Please consult
your camera manufacturer’s documentation for instructions
to use these tools.
• From the digital camera’s interface, select the photograph to
download to Pagis Pro, and click the appropriate command
(for example, Download or Get Image). After the image is
completely downloaded, it appears in Pagis Pro’s Scanner
Progress dialog box (refer to Figure 4–23).