
3.0

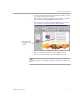

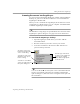


Table Of Contents
- Welcome
- Installation and Setup
- Introduction to PageKeeper
- Getting Started Exercises
- Organizing and Working with Documents
- Finding Documents
- Technical Information

Adding Documents to PageKeeper
42 Chapter 4
4 Click the Scan button to begin scanning.
By default, you will see a preview of your scanned image
before it is added to PageKeeper.
5 Make any desired adjustments in the Preview dialog box and
click
Save Modifications
.
Or, click
Cancel Modifications
if you want to undo your
modifications and continue with the page as it originally was.
By default, you will be asked if you want to scan more pages.
6 Click
Ye s
to continue scanning additional pages. (Be sure to put
the next page in the scanner first.)
Or, click
No
to end the scanning session and add the scanned
document to PageKeeper.
The scanned document is added to the currently open folder.
To scan with the PK Scan button:
1 Choose
Start
Programs
Caere Applications
PageKeeper
Scan
in the Windows taskbar to open the PK Scan button.
2 Place the document you want to scan in your scanner.
3 Select an option in the PK Scan button drop-down list.
Enter a disk location
and file name for saving
the image file if you do
not want to use the
default settings.
Click this to rotate
the image 90
degrees clockwise.
Type in some keywords
that describe the image,
if desired.
Click this to
reverse the light
and dark elements
of the image.
Click this to cancel
any modifications
and add the image.
Click this to save
any modifications
and add the image.
The preview of the
image appears here.
Click here to select custom
options before scanning.
Click here to
start scanning.
Click here to select an option for
scanning in the drop-down list.