
X

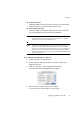
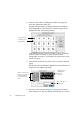

Table Of Contents
- Welcome
- Chapter 1
- Chapter 2
- Chapter 3
- Chapter 4
- Chapter 5
- Chapter 6
94 Customizing OCR
The last three settings define the left and right limits of the text
area and first-line indenting. Choose Auto to let OmniPage Pro
decide the values. Enter numerical values or drag the markers in
the ruler to change settings.
The panel below the ruler displays the effects of your settings.
Repeat the above steps to edit other zone styles. Click Delete Style
to delete a selected zone style from the style set. Click Make
Default to make a selected zone style the default style applied to all
zones when a style set is first selected for a page.
t To add new zone styles to the current style set:
Open the Edit Style Set dialog box and click New Style.
Enter a name for the zone style you want to add and click OK.
For example, you could enter
Heading as the name if you are
creating a style for heading-type paragraphs.
Modify the desired formatting attributes for the new style, as
described in the previous procedure.
Repeat steps 2-4 to continue adding new styles to the style set.
Click OK when you are finished editing the style set.
Click Done in the Style Sets dialog box if you do not want to edit
any other style sets.
Font mapping
If Auto is selected as the font setting for a zone style, OmniPage Pro
analyses the text styling inside the zone and assigns it to one of four
categories. More than one text category may be detected within a
single zone. Each category is mapped to a font which you can specify.
u Proportional Serif
Character widths vary and short lines finish off letter strokes. This
text is an example of this font type. The default font is Times.
u Proportional Sans-Serif
Character widths vary; letter strokes do not have finishing lines.
The default font is Helvetica.