
9.0

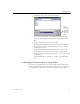
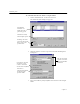
Table Of Contents
- Welcome
- Installation and Setup
- Introduction to OmniPage Pro
- Processing Documents
- OmniPage Pro Settings
- Customizing OCR
- Technical Information
- General Troubleshooting Solutions
- Supported File-Format Types
- Scanner Setup Issues
- Scanner Drivers Supplied by the Manufacturer
- Scanner Drivers Supplied by Caere
- Scan Manager is Needed with OmniPage Pro
- Problems Connecting OmniPage Pro to Your Scanner
- Missing Scan Image Command
- Scanner Message on Launch
- System Crash Occurs While Scanning
- Scanner Not Listed in Supported Scanners List Box
- Scanning Tips
- OCR Problems
- Uninstalling the Software

Saving Settings Files
Customizing OCR 79
3 Click
Save Settings...
to open the Save Settings dialog box.
4 Select a folder location for the settings file.
5 Type in a file name for the settings file and click
OK
.
All the current settings in the Options dialog box are saved into
a settings file with an .ini extension.
6 Click
OK
to close the Options dialog box.
To load a settings file:
1 Choose
Options...
in the Tools menu to open the Options dialog
box.
2 Click
Load Settings...
to open the Load Settings dialog box.
3 Select the folder location of the settings file you want to load.
4 Select the name of the settings file you want to load and click
OK
.
The settings change according to the selected file.
5 Click
OK
to close the Options dialog box.