
9.0

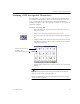
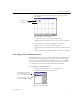
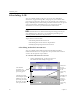
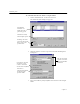
Table Of Contents
- Welcome
- Installation and Setup
- Introduction to OmniPage Pro
- Processing Documents
- OmniPage Pro Settings
- Customizing OCR
- Technical Information
- General Troubleshooting Solutions
- Supported File-Format Types
- Scanner Setup Issues
- Scanner Drivers Supplied by the Manufacturer
- Scanner Drivers Supplied by Caere
- Scan Manager is Needed with OmniPage Pro
- Problems Connecting OmniPage Pro to Your Scanner
- Missing Scan Image Command
- Scanner Message on Launch
- System Crash Occurs While Scanning
- Scanner Not Listed in Supported Scanners List Box
- Scanning Tips
- OCR Problems
- Uninstalling the Software

Training OCR for Special Characters
76 Chapter 5
The Specify Character dialog box shows how the selected
character appeared in the original page image.
6 Specify how you want OmniPage Pro to interpret the character
during OCR by entering a character in the
Character
edit box.
7Click
OK
to
return to the Train Characters dialog box.
8 Repeat steps 5–7 to continue specifying characters.
9Click
Save
to save the specified characters to a training file.
Or, click
Append
to add the specified characters to another
training file.
After saving or appending to a file, you are asked if you want
to make this the current training file. Click
Yes
to recognize the
current page using the training file you just created. Click
No
to
return to the image without recognizing it.
Training files are saved in the data folder in your installation folder. You
can select them in the
Accuracy
tab of the Options dialog box.
To edit a training file:
1 Choose
Edit Training File...
in the Tools menu.
A
dialog box appears listing all your training files.
2 Double-click the training file you want to edit. Or, select it and
click
Edit.
Click the character
you want to
associate with the
selected character
The original
image of the
selected
character
The associated
character appears
here