
9.0
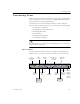

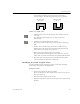
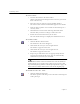
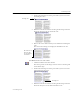
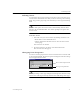
Table Of Contents
- Welcome
- Installation and Setup
- Introduction to OmniPage Pro
- Processing Documents
- OmniPage Pro Settings
- Customizing OCR
- Technical Information
- General Troubleshooting Solutions
- Supported File-Format Types
- Scanner Setup Issues
- Scanner Drivers Supplied by the Manufacturer
- Scanner Drivers Supplied by Caere
- Scan Manager is Needed with OmniPage Pro
- Problems Connecting OmniPage Pro to Your Scanner
- Missing Scan Image Command
- Scanner Message on Launch
- System Crash Occurs While Scanning
- Scanner Not Listed in Supported Scanners List Box
- Scanning Tips
- OCR Problems
- Uninstalling the Software

Customizing Zones
Customizing OCR 71
Deleting Zones
You can delete the current zones if you want to create new zones. You
can also delete individual zones that you do not want to process during
OCR. Any part of a page image not enclosed by a zone is ignored during
OCR.
To delete and replace the current zones automatically, click the Zone
button in the AutoOCR toolbar. You will be prompted to replace the
current zones.
To delete zones:
1 Select the zone you want to delete by clicking inside the zone.
• Shift-click to select additional zones.
• Choose
Select All
in the Edit menu to select all zones on the
current page.
Selected zones are shaded.
2 Press the Delete key or choose
Clear
in the Edit menu.
The selected zones disappear.
Changing Zone Properties
You can set certain properties for zones to customize how each zone will
be treated during OCR. The Zone Properties dialog box contains settings
for
zone type
and
zone content
.
When you change a zone type using the Zone Properties button, newly
drawn zones
and
any previously selected zones will change zone type.
Zone type drop-down list
Zone content drop-down list