
9.0

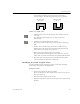
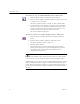
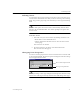
Table Of Contents
- Welcome
- Installation and Setup
- Introduction to OmniPage Pro
- Processing Documents
- OmniPage Pro Settings
- Customizing OCR
- Technical Information
- General Troubleshooting Solutions
- Supported File-Format Types
- Scanner Setup Issues
- Scanner Drivers Supplied by the Manufacturer
- Scanner Drivers Supplied by Caere
- Scan Manager is Needed with OmniPage Pro
- Problems Connecting OmniPage Pro to Your Scanner
- Missing Scan Image Command
- Scanner Message on Launch
- System Crash Occurs While Scanning
- Scanner Not Listed in Supported Scanners List Box
- Scanning Tips
- OCR Problems
- Uninstalling the Software

Customizing Zones
68 Chapter 5
4 Release the mouse button when you are finished subtracting
from the zone.
The zone border changes to display the modified zone area.
Table zones are constrained to rectangular and square shapes.
Attempting to modify the area of a table zone to an irregular shape is not
allowed. Table zones, however, can be resized, and it is recommended
that you resize the table zone as described on “To extend an area of a
zone:” on page 66.
To connect two or more zones:
1 Click the Add to Zone button.
The mouse pointer in the image viewer becomes a drawing tool
with a plus sign.
2 Hold the mouse button down and drag the drawing tool over
the area where you want the zones to be connected.
3 Release the mouse button when you are done.
The zone border changes to display the modified zone area.
To divide a zone:
1 Click the Subtract from Zone button.
The mouse pointer in the image viewer becomes a drawing tool
with a minus sign.
2 Hold the mouse button down and drag the area where you
want to divide the zone.
3 Release the mouse button when you are done.
The zone border changes to display the modified zone area.