
9.0

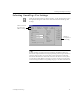
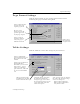
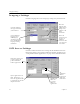
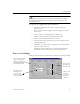
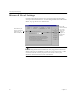
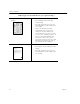
Table Of Contents
- Welcome
- Installation and Setup
- Introduction to OmniPage Pro
- Processing Documents
- OmniPage Pro Settings
- Customizing OCR
- Technical Information
- General Troubleshooting Solutions
- Supported File-Format Types
- Scanner Setup Issues
- Scanner Drivers Supplied by the Manufacturer
- Scanner Drivers Supplied by Caere
- Scan Manager is Needed with OmniPage Pro
- Problems Connecting OmniPage Pro to Your Scanner
- Missing Scan Image Command
- Scanner Message on Launch
- System Crash Occurs While Scanning
- Scanner Not Listed in Supported Scanners List Box
- Scanning Tips
- OCR Problems
- Uninstalling the Software

Page Format Settings
OmniPage Pro Settings 47
Page Format Settings
Click the
Page Format
tab to select settings that determine how the
formatting of a page is handled during OCR.
Tables Settings
Click the
Tables
tab to select table settings for your document.
Click to select
font options for
recognized text
The page icons
change to depict the
general appearance
of your page original.
Select a setting to
determine what you
want your page to
look like after OCR.
Select a setting that best
describes how your
original page looks.
Select to automatically
detect tables that have grid
lines between rows and
columns.
If your target application is
Microsoft Word or
WordPerfect, you can select
Table objects... to have
tables saved with their
grids. Otherwise, tables will
be saved as tab-delimited
text.
Changing the line styles using
the drop-down menus will
change the page icon to show
the general appearance you can
expect of the table grids and
border after export.
These drop-down menus
determine how your table
borders will look after export.
And, once line styles are changed,
the color of the grid in the image
viewer also changes to:
Light red shows single lines
Dark red shows double lines
Gray shows no lines