
9.0

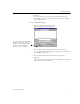


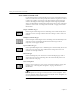
Table Of Contents
- Welcome
- Installation and Setup
- Introduction to OmniPage Pro
- Processing Documents
- OmniPage Pro Settings
- Customizing OCR
- Technical Information
- General Troubleshooting Solutions
- Supported File-Format Types
- Scanner Setup Issues
- Scanner Drivers Supplied by the Manufacturer
- Scanner Drivers Supplied by Caere
- Scan Manager is Needed with OmniPage Pro
- Problems Connecting OmniPage Pro to Your Scanner
- Missing Scan Image Command
- Scanner Message on Launch
- System Crash Occurs While Scanning
- Scanner Not Listed in Supported Scanners List Box
- Scanning Tips
- OCR Problems
- Uninstalling the Software

Exporting Documents
34 Chapter 3
Exporting Documents
You can export a document to other applications by:
• Saving a Document
• Copying a Document to the Clipboard
• Sending a Document as a Mail Attachment
After you export a document, a copy of the document remains open in
OmniPage Pro. Save the document as an OmniPage Document (*.met)
if you want to reopen it in OmniPage Pro again. OmniPage Documents
retain all original images, zones, and recognized text.
Saving a Document
You can save recognized text and original images to disk in a variety of
file types.
To save recognized text:
1 Choose
Save As...
in the File menu.
You can also click the Export button with
Save As
selected in the
drop-down list.
The Save As dialog box appears.
2 Select a folder location and file type for your document.
See “Supported File-Format Types” on page 89 for a complete
list of supported file types.
3 Type in a file name and select save options.
The Add to PageKeeper setting only
appears if you have PageKeeper
installed on your computer. It puts a
link to the saved document in
PageKeeper’s default folder.