
9.0

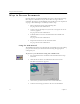
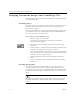

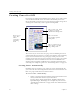
Table Of Contents
- Welcome
- Installation and Setup
- Introduction to OmniPage Pro
- Processing Documents
- OmniPage Pro Settings
- Customizing OCR
- Technical Information
- General Troubleshooting Solutions
- Supported File-Format Types
- Scanner Setup Issues
- Scanner Drivers Supplied by the Manufacturer
- Scanner Drivers Supplied by Caere
- Scan Manager is Needed with OmniPage Pro
- Problems Connecting OmniPage Pro to Your Scanner
- Missing Scan Image Command
- Scanner Message on Launch
- System Crash Occurs While Scanning
- Scanner Not Listed in Supported Scanners List Box
- Scanning Tips
- OCR Problems
- Uninstalling the Software

Ways to Process Documents
18 Chapter 3
Ways to Process Documents
Optical character recognition (OCR) is the process of turning an image
into computer-editable text so you do not have to retype the text
manually. The basic steps of OmniPage Pro’s OCR process are explained
on page 9. The following is a summary of those steps.
1 Bring a document image into OmniPage Pro.
See page 20 for more information.
2 Create zones to identify areas you want to recognize as text or
retain as graphics.
See page 22 for more information.
3 Perform OCR to convert text information into editable text
characters.
See page 23 for more information.
4 Export the document to the desired location.
See page 34 for more information.
Using the OCR Wizard
The OCR Wizard guides you through the entire OCR process by asking
you questions about your document and selecting the appropriate
settings for you.
To process your document using the OCR Wizard:
1Set
OCR Wizard
as the command in the AUTO button’s drop-
down list.
2 Click AUTO or choose
OCR Wizard
in the Process menu.
The first wizard screen appears.
3 Answer the question in the first screen and click
Next
.
4 Continue answering questions in the screens that follow.