
9.0


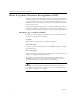
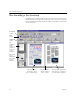
Table Of Contents
- Welcome
- Installation and Setup
- Introduction to OmniPage Pro
- Processing Documents
- OmniPage Pro Settings
- Customizing OCR
- Technical Information
- General Troubleshooting Solutions
- Supported File-Format Types
- Scanner Setup Issues
- Scanner Drivers Supplied by the Manufacturer
- Scanner Drivers Supplied by Caere
- Scan Manager is Needed with OmniPage Pro
- Problems Connecting OmniPage Pro to Your Scanner
- Missing Scan Image Command
- Scanner Message on Launch
- System Crash Occurs While Scanning
- Scanner Not Listed in Supported Scanners List Box
- Scanning Tips
- OCR Problems
- Uninstalling the Software

The OmniPage Pro Desktop
Introduction to OmniPage Pro 11
AutoOCR Toolbar
The AutoOCR
®
toolbar contains buttons that can activate each step of
the OCR process.
You can set different commands in the AutoOCR toolbar buttons for the
operations you want to perform. Choose a command using each
buttons’s drop-down list.
• The AUTO button allows you to activate automatic processing or
use the OCR Wizard.
•The Image
button allows you to bring in images by scanning or
loading pages.
• The Zone button allows you to automatically create zones on
images based on their original page layouts or predefined
templates.
• The OCR button allows you to perform OCR, train characters for
OCR, or schedule OCR at a later time.
• The Export button allows you to save, copy, or send your
recognized document as a mail attachment.
Please see “Setting AutoOCR Toolbar Commands” on page 40 for more
information on each toolbar button. Also see the separately enclosed
OmniPage Pro 9 Reference card, which shows all available AutoOCR
toolbar commands.
AUTO
button
Image
button
Zone
button
OCR
button
Export
button
Click the down arrow to
display the commands in a
button’s drop-down list.