
8.0
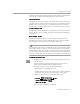
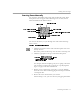
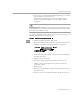

Table Of Contents
- Introduction to OmniPage Pro
- Installation and Setup
- Processing Documents
- OmniPage Pro Settings
- Customizing OCR
- Technical Information
- Glossary Terms

Converting Images to Text
Processing Documents - 38
This section describes the following procedures:
• Performing OCR
• Proofreading OCR Results
• Verifying Recognized Text
• Displaying Color Markers
• Getting Page Information
Performing OCR
Before performing OCR, make sure the current zones and settings are
appropriate for your document. For example, to retain graphic zones
during OCR, you must select
Retain Graphics
in the
OCR
section of the
Settings Panel. See “Settings Guidelines” on page 79 for more
information.
OmniPage Pro only recognizes printed text characters, such as laser-
printed or typewriter text. However, it can retain handwritten text, such
as a signature, as a graphic element. See page 77 for guidelines on
retaining graphics.
To perform OCR:
1Set
Perform OCR
as the command in the OCR button’s pop-up
menu.
The default command,
OCR & Proof,
prompts you to check for
errors
after
OCR.
2 Click the OCR button or choose
Perform OCR
in the Process
menu.
The page is recognized according to the current zones and
settings. If there are no zones on the page, zones are created
automatically or with a currently selected zone template.
Recognized text appears in the Text View.
Proofreading OCR Results
Recognized text appears in the Text View after OCR so you can check for
errors and misspellings in the text before exporting it to another
application.
Error checking starts automatically after OCR if you chose
OCR & Proof
as the OCR command.