
8.0
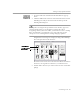
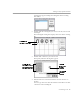
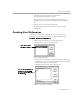
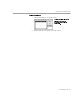
Table Of Contents
- Introduction to OmniPage Pro
- Installation and Setup
- Processing Documents
- OmniPage Pro Settings
- Customizing OCR
- Technical Information
- Glossary Terms

Training OCR for Special Characters
Customizing OCR - 105
The Specify Character dialog box displays the selected
character as it appears in the original page image.
6 Specify how you want OmniPage Pro to interpret the character
during OCR.
You can type the desired character(s) in the
Character Code
edit
box. Or, click a character in the scrolling list to add it to the edit
box.
7Click
OK
to accept the character specification.
The Training File dialog box reappears.
8 Repeat steps 5–7 to continue specifying characters.
9 Click
Save
to save the specified characters to a training file.
Or, click
Append
to add the specified characters to another
training file.
After saving or appending a file, you are asked if you want to
make this the current training file. Click
OK
to recognize the
current page using the training file you just created. Click
Cancel
to return to the image without recognizing it.
Training files can be selected in the
OCR
section of the Settings Panel. If
you use a training file to help recognize a page image, that training file
remains selected until you change it.
To edit a training file:
1 Choose
Edit Training File...
in the Settings menu.
Click any character
you want to
associate with the
selected character
Origina l
Image of the
selected
character