
7.0
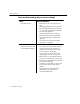

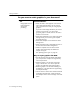

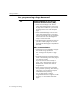

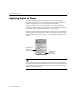
Table Of Contents
- Introduction to OmniPage Pro
- Installation and Setup
- Processing Documents
- Basic Steps of OmniPage Pro OCR
- Selecting Process Commands
- Automatic Processing
- Bringing Document Images into OmniPage Pro
- Creating Zones on a Page
- Converting Images to Text
- Scheduling OCR
- Direct Input: Pasting Text into Other Applications...
- Working With Documents
- Exporting Documents
- OmniPage Pro Settings
- Customizing OCR
- Technical Information
- Glossary

Settings Guidelines
94 - OmniPage Pro Settings
Do you want to retain graphics in your document?
Yes
Ke ep graphics suc h as
logos and photos
during OCR
processing
Recommendations:
Select 3D OCR or Auto Brightness in the Scanner
section of the Settings Panel if you are scanning
with a grayscale scanner and you want grayscale
graphics.
If you have HP AccuPage selected as your scanner
extension in the Chooser, you cannot retain
grayscale graphics. Instead, select the HP Scan 2
extension in the Chooser.
Select Manual Brightness in the OCR section of the
Settings Panel if you are scanning line-art (black
and white) drawings.
Select Retain Graphics in the OCR section of the
Settings Panel.
Select Save Page Image in OmniPage Document in
the Document section of the Settings Panel.
Make sure separate zones are drawn around
graphic areas and that they are identified as
Graphic zone types.
See Specifying Zone Types on page 32.
Ways to export graphics after OCR:
Save the document to the file format supported by
your word processor. Graphics are supported by
most word processors.
Select the graphic in the Text View and choose
Copy in the Edit menu. You can then paste the
graphic into applications that support graphics.
Select the graphic in the Text View and drag it to
the desktop or to an application that supports drag
and drop functionality.
Choose Save As in the File menu. Select the desired
image file format and select Create One File for
Each Graphic Zone on the Current Page as the save
option.