
7.0
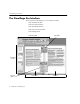
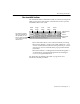
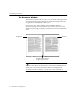
Table Of Contents
- Introduction to OmniPage Pro
- Installation and Setup
- Processing Documents
- Basic Steps of OmniPage Pro OCR
- Selecting Process Commands
- Automatic Processing
- Bringing Document Images into OmniPage Pro
- Creating Zones on a Page
- Converting Images to Text
- Scheduling OCR
- Direct Input: Pasting Text into Other Applications...
- Working With Documents
- Exporting Documents
- OmniPage Pro Settings
- Customizing OCR
- Technical Information
- Glossary

The OmniPage Pro Interface
Introduction to OmniPage Pro - 9
The AutoOCR Toolbar
The AutoOCR toolbar contains buttons that can activate each step of the
OCR process. Choose
Show Toolbar
in the Window menu to open the
AutoOCR toolbar if it is closed.
The
AUTO
button allows you to activate automatic processing.
The next four buttons Image, Zone, OCR, and Export have
various commands that can be set for the operations you want to
perform. You can set commands in the pop-up menus beneath
each button.
The last two buttons Settings Panel and Check Recognition
are shortcuts for opening the Settings Panel and checking for
errors in a recognized document.
See Basic Steps of OmniPage Pro OCR on page 26 for more
information on OCR procedures.
Settings Panel
button
Check
Recognition
button
AUTO
button
Image
button
Zone
button
OCR
button
Export
button
The status line reports
the current operation or
the operation you can
do next. Click the small
arrow to show or hide
the status line.