
7.0
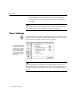
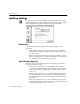
Table Of Contents
- Introduction to OmniPage Pro
- Installation and Setup
- Processing Documents
- Basic Steps of OmniPage Pro OCR
- Selecting Process Commands
- Automatic Processing
- Bringing Document Images into OmniPage Pro
- Creating Zones on a Page
- Converting Images to Text
- Scheduling OCR
- Direct Input: Pasting Text into Other Applications...
- Working With Documents
- Exporting Documents
- OmniPage Pro Settings
- Customizing OCR
- Technical Information
- Glossary

OCR Settings
78 - OmniPage Pro Settings
Style Set Used When Creating Documents
Select the style set you want to use whenever a new document is created
in OmniPage Pro. A style set contains one or more zone styles that you
can apply to zones before OCR. This is similar to applying styles to
paragraphs in your word processor. During OCR, the selected styles
specify how recognized text will be formatted.
In addition to the style sets that are shipped with OmniPage Pro, any
style sets that you create appear in the pop-up menu. See page 100 for
descriptions of built-in style sets and instructions for creating new style
sets.
To change the style set for pages that are already open, use the Zone Info
palette that is displayed when the Image View is active. Choose
Show
Zone Info Palette
in the Window menu (or press the z key) to display
the palette if it is closed.
Retain Graphics
Select
Retain Graphics
if you want OmniPage Pro to retain original
graphics, such as photographs or drawings, in the recognized
document.
To retain graphics, you must also do the following before recognition:
Make sure
Save Page Image in OmniPage Document
is selected in
the
Document
section of the Settings Panel.
Make sure that graphics on a page image are identified as
Graphic
zone types. These have green borders and display a graphic icon.
See Specifying Zone Types on page 32 for more information.
For additional guidelines, see Do you want to retain graphics in your
document? on page 94.
Reject Character
Unrecognizable characters are represented by a red reject character
when recognized text is displayed in the Text View. Type the character
you want to use in the
Reject Character
edit box. The default character is
a tilde (~).
For example, if OmniPage Pro could not recognize the J in REJECT, and
the tilde (~) was the reject character, the string RE~ECT would appear
in your recognized document.