
7.0
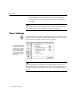
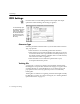
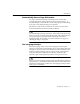
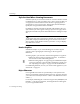
Table Of Contents
- Introduction to OmniPage Pro
- Installation and Setup
- Processing Documents
- Basic Steps of OmniPage Pro OCR
- Selecting Process Commands
- Automatic Processing
- Bringing Document Images into OmniPage Pro
- Creating Zones on a Page
- Converting Images to Text
- Scheduling OCR
- Direct Input: Pasting Text into Other Applications...
- Working With Documents
- Exporting Documents
- OmniPage Pro Settings
- Customizing OCR
- Technical Information
- Glossary

OCR Settings
76 - OmniPage Pro Settings
OCR Settings
Click the
OCR
icon in the Settings Panel to select input and output
options that assist OmniPage Pro during recognition.
Character Type
Select the printed text characteristics of your document in the
Character
Type
pop-up menu.
Select
Normal
for conventionally printed text characters.
Select
OCR-A
for text printed in OCR-A font. OCR-A is a special
font used for items such as part numbers and utility bills. (If your
document contains a mixture of OCR-A and a conventional font,
select
Normal
for faster recognition.)
Select
Dot Matrix
for text characters printed with a 9-pin,
monospaced dot-matrix printer.
Training File
A
training file
is a set of up to 256 pre-recognized text characters that
OmniPage Pro compares with characters it is trying to recognize. Select
a training file that you want OmniPage Pro to use in the
Training File
pop-up menu.
None
is the only option if you have not created any
training files.
Training files are useful for recognizing characters that might normally
be difficult to recognize. To create a training file, see Training OCR for
Special Characters on page 111.
To automatically open
the Settings Panel to the
OCR section, Option-
click the OCR button in
the AutoOCR toolbar.
(A document must be
open for the button to
be active.)