
7.0

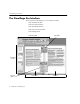
Table Of Contents
- Introduction to OmniPage Pro
- Installation and Setup
- Processing Documents
- Basic Steps of OmniPage Pro OCR
- Selecting Process Commands
- Automatic Processing
- Bringing Document Images into OmniPage Pro
- Creating Zones on a Page
- Converting Images to Text
- Scheduling OCR
- Direct Input: Pasting Text into Other Applications...
- Working With Documents
- Exporting Documents
- OmniPage Pro Settings
- Customizing OCR
- Technical Information
- Glossary

What Is Optical Character Recognition (OCR)?
Introduction to OmniPage Pro - 7
Basic Steps of OmniPage Pro OCR
These are the basic steps of OmniPage Pros OCR process:
1 Bring a document image into OmniPage Pro.
You can scan a paper document or load an image file. The
resulting image appears in the Image View.
See Bringing Document Images into OmniPage Pro on page
28 for more information.
2 Create
zones
to identify the parts of the document you want to
recognize as text or retain as graphics.
Zones are borders that enclose the parts of a document image
that will get processed. You can create zones manually,
automatically, or with a template. Any areas not enclosed by
zones are ignored during OCR.
See Creating Zones on a Page on page 31 for more
information.
3 Perform OCR to convert text information into editable text
characters.
During OCR, OmniPage Pro defines text characters in an
image. After OCR, you can check for and edit any errors.
See Converting Images to Text on page 40 for more
information.
4 Export the document to the desired location.
You can save your document to a specified file format or place
it on the Clipboard.
See Exporting Documents on page 60 for more information.