
7.0


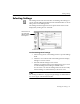

Table Of Contents
- Introduction to OmniPage Pro
- Installation and Setup
- Processing Documents
- Basic Steps of OmniPage Pro OCR
- Selecting Process Commands
- Automatic Processing
- Bringing Document Images into OmniPage Pro
- Creating Zones on a Page
- Converting Images to Text
- Scheduling OCR
- Direct Input: Pasting Text into Other Applications...
- Working With Documents
- Exporting Documents
- OmniPage Pro Settings
- Customizing OCR
- Technical Information
- Glossary

Exporting Documents
Processing Documents - 61
4 Select the appropriate file format for your document in the
Format
pop-up menu.
The available file formats depend on the particular document
you are saving. For example, if you are saving an unrecognized
image, you can only save it as an OmniPage Document or an
image file. See Supported File Formats on page 129 for more
information.
5 Select the appropriate save option if you are saving the
document in a file format other than OmniPage Document.
6 Click
Save
.
The document is saved to disk as specified. Retained graphics
are saved with the file only if the selected format supports
them.
The maximum file name length is 31 characters. File names are
appended with a . and a number when you select a save option that
creates more than one file. This counts as part of the 31-character limit,
so file names will get cut short if they are too long.
To save automatically after automatic processing:
1Set
Auto Save
as the command in the Export buttons pop-up
menu.
2 Click
AUTO
when you are ready to start processing your
document.
The Auto Save dialog box appears first so you can select save
options for the document.
3 Select the desired save options and click
Save
.
Automatic processing occurs according to the selected
commands. After the file is finished, it is automatically saved as
specified.