
7.0

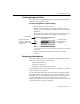
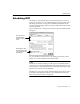
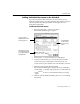
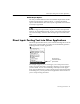
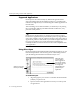
Table Of Contents
- Introduction to OmniPage Pro
- Installation and Setup
- Processing Documents
- Basic Steps of OmniPage Pro OCR
- Selecting Process Commands
- Automatic Processing
- Bringing Document Images into OmniPage Pro
- Creating Zones on a Page
- Converting Images to Text
- Scheduling OCR
- Direct Input: Pasting Text into Other Applications...
- Working With Documents
- Exporting Documents
- OmniPage Pro Settings
- Customizing OCR
- Technical Information
- Glossary

Scheduling OCR
Processing Documents - 47
Adding Individual Documents to the Schedule
If you have documents that need to be converted to text, you can
manually add them to the processing schedule. Files will be recognized
after the specified time. Recognized files are then placed in the
designated output folder.
To add individual documents:
1 Choose
Schedule OCR...
in the Process menu.
The Schedule OCR dialog box appears.
2 Click
Add Files...
to open a dialog box for adding files.
3 Locate and select the files you want to add to the schedule.
Click
Add
to place a selected file on the
Selected Files
list.
Click
Add All
to place all files in the current folder on the list.
4 Click
Done
after selecting the desired files.
The Schedule OCR dialog box displays the newly added files.
Click
Modify...
to change output options for an individual file.
Click
Remove
to remove a selected file from the processing
queue.
5 Click
OK
in the Schedule OCR dialog box to save your settings
as specified.
OmniPage Pro starts
processing documents
in the queue after the
specified time.
The Input File List
displays all files in the
processing queue.
Click Add Files...
to add a file to
the processing
queue.