
7.0

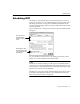
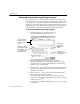
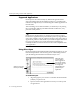
Table Of Contents
- Introduction to OmniPage Pro
- Installation and Setup
- Processing Documents
- Basic Steps of OmniPage Pro OCR
- Selecting Process Commands
- Automatic Processing
- Bringing Document Images into OmniPage Pro
- Creating Zones on a Page
- Converting Images to Text
- Scheduling OCR
- Direct Input: Pasting Text into Other Applications...
- Working With Documents
- Exporting Documents
- OmniPage Pro Settings
- Customizing OCR
- Technical Information
- Glossary

Converting Images to Text
Processing Documents - 43
Verifying Recognized Text
You can compare recognized text against its original image to make sure
that text was recognized correctly.
To verify text against its original image:
1 Make sure the Text View is active.
2 Hold down the Option key and double-click the word you
want to verify. Or, select the word and choose
Verify Text
in the
Edit menu.
The Verification window opens and shows a clear close-up of
the original word and its surrounding area in the image.
You can type in a new word to replace the selected word in the
Text View.
3 Click the standard Close button to close the Verification
window.
Displaying Color Markers
After OCR, certain text in the recognized document might be marked
with color in the Text View. These include:
Reject characters (red)
Suspect words (green)
Language Analyst replacements (blue)
To permanently remove color markers, choose
Clear Markers
in the Edit
menu. All text reverts to black.
You can also temporarily hide color markers by choosing
Hide Markers
in the Edit menu. To show markers again, choose
Show Markers
in the
Edit menu. The current marker setting is used for all documents. For
example, if
Hide Markers
is currently chosen, markers will not be
displayed in any documents. Color markers are not retained when you
export a document to another application.
The image of the
selected word is
highlighted.
Close button
Click the Verification
window to zoo m in for a
closer view. Option-click
to zoom out.