
7.0
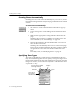
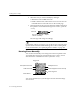
Table Of Contents
- Introduction to OmniPage Pro
- Installation and Setup
- Processing Documents
- Basic Steps of OmniPage Pro OCR
- Selecting Process Commands
- Automatic Processing
- Bringing Document Images into OmniPage Pro
- Creating Zones on a Page
- Converting Images to Text
- Scheduling OCR
- Direct Input: Pasting Text into Other Applications...
- Working With Documents
- Exporting Documents
- OmniPage Pro Settings
- Customizing OCR
- Technical Information
- Glossary

Creating Zones on a Page
Processing Documents - 39
To connect two or more zones:
1 Click the Modify Zones tool in the Tool palette.
2 Position the mouse pointer in one of the zones you want to
connect.
3 Hold the mouse button down and drag the mouse pointer onto
the zones you want to connect.
4 Release the mouse button when you are done.
The zone border changes to display the modified zone area.
To divide a zone:
1 Click the Modify Zones tool in the Tool palette.
2 Position the mouse pointer at the point where you want to
divide the zone.
3 Hold down the Command key (a) and the mouse button while
dragging the mouse pointer over the area where you want the
separation to occur.
4 Release the mouse button when you are done.
The zone border changes to display the modified zone area.
To delete zones:
1 Click the Draw/Select Zones tool in the Tool palette if it is not
already selected.
2 Select the zone you want to delete by clicking it.
Handles appear on the selected zone.
Shift-click to select additional zones.
Double-click the Draw/Select Zones tool or choose
Select All
in the Edit menu to select all zones on the current page.
3 Press the Delete key or choose
Clear
in the Edit menu.
The selected zones disappear, but the page image itself remains
the same. Any part of a page image not enclosed by a zone is
ignored during OCR.