
7.0
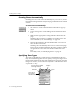
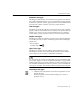
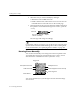
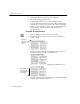
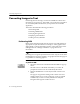
Table Of Contents
- Introduction to OmniPage Pro
- Installation and Setup
- Processing Documents
- Basic Steps of OmniPage Pro OCR
- Selecting Process Commands
- Automatic Processing
- Bringing Document Images into OmniPage Pro
- Creating Zones on a Page
- Converting Images to Text
- Scheduling OCR
- Direct Input: Pasting Text into Other Applications...
- Working With Documents
- Exporting Documents
- OmniPage Pro Settings
- Customizing OCR
- Technical Information
- Glossary

Creating Zones on a Page
38 - Processing Documents
3 Click within the next zone you want recognized.
The number
2
appears in the zone.
4 Continue until all the zones are appropriately ordered.
If you do not number all the zones, they will be automatically
numbered for you when you select another tool or start OCR.
Unless you are using the
True Page
style set, the order of zones
determines the order in which text will be placed on a
recognized page.
To extend an area of a zone:
1 Click the Modify Zones tool in the Tool palette.
2 Position the mouse pointer over the area of a zone that you
want to extend.
3 Hold down the mouse button and drag the mouse pointer in
the direction that you want to extend the zone.
The zone border changes to display the modified zone area.
To remove an area of a zone, hold down the Command key (a)
while using the Modify Zones tool.
The mouse
pointer is
above the
zone
The left area of
this zone has
been extended
downward