
7.0
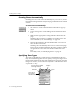
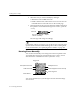
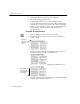
Table Of Contents
- Introduction to OmniPage Pro
- Installation and Setup
- Processing Documents
- Basic Steps of OmniPage Pro OCR
- Selecting Process Commands
- Automatic Processing
- Bringing Document Images into OmniPage Pro
- Creating Zones on a Page
- Converting Images to Text
- Scheduling OCR
- Direct Input: Pasting Text into Other Applications...
- Working With Documents
- Exporting Documents
- OmniPage Pro Settings
- Customizing OCR
- Technical Information
- Glossary

Creating Zones on a Page
32 - Processing Documents
Creating Zones Automatically
OmniPage Pro can create zones automatically for you. To do so, it uses
the selected zoning method to analyze the page and break it into ordered
sections.
To create zones automatically:
1 Set
Auto Zones
as the command in the Zone buttons pop-up
menu.
2 Choose
Settings Panel
in the Settings menu and click the
Zones
icon.
3 Make sure the appropriate zoning method is selected for the
page.
OmniPage Pro uses this as a guideline for creating zones. For
more information, see Zone Settings on page 74.
4 Click the Zone button in the AutoOCR toolbar or choose
Auto
Zones
in the Process menu.
OmniPage Pro automatically draws zones on the current page.
Each zone has a number indicating the order in which it will be
recognized. The color of the zone border indicates the zone
type.
To modify zones, see Modifying Zones on page 37.
Specifying Zone Types
All zones are identified as a particular type. This determines the way
they are treated during OCR. You can specify zone types using tools in
the Zone Info palette. If the Zone Info palette does not appear when the
Image View is active, choose
Show Zone Info Palette
in the Window menu
or press the z key.
Zone type of
the currently
selected zone
Text (use only for tables
and single columns)
Automatic
Ignore
Graphic