
7.0


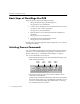


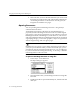
Table Of Contents
- Introduction to OmniPage Pro
- Installation and Setup
- Processing Documents
- Basic Steps of OmniPage Pro OCR
- Selecting Process Commands
- Automatic Processing
- Bringing Document Images into OmniPage Pro
- Creating Zones on a Page
- Converting Images to Text
- Scheduling OCR
- Direct Input: Pasting Text into Other Applications...
- Working With Documents
- Exporting Documents
- OmniPage Pro Settings
- Customizing OCR
- Technical Information
- Glossary

Bringing Document Images into OmniPage Pro
Processing Documents - 29
4 Click the Image button in the AutoOCR toolbar or choose
Scan
Image
in the Process menu.
Pages are scanned in order and the resulting images appear in
the Image View. Scanned pages become your working
document if a document is not currently open. If a document is
currently open, the page images are added as new pages.
Loading Image Files
You can load TIFF and PICT image files into OmniPage Pro. An image
file is an electronic picture of text, such as a fax or scanned image, that is
saved in an image file format. After you load an image file into
OmniPage Pro, it appears in the Image View.
To load image files into OmniPage Pro:
1Set
Load Image
as the command in the Image buttons pop-up
menu.
2 Click the Image button or choose
Load Image...
in the Process
menu.
The Load Image dialog box appears.
3 Open the folder where your image files are located.
4 Select the file you want to load and then click
Add
. Or, double-
click the file.
The file appears in the
Selected Files
list.
To add all image files from an open folder, click
Add All
.
To remove an image file from the
Selected Files
list, select the
file and then click
Remove
.
Repeat steps 3 and 4 to add image files from other folders. You
can select up to 256 files.
This button
changes to
Load when a
file is added
to the
Selected
Files list.