
7.0
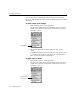

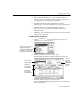
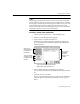
Table Of Contents
- Introduction to OmniPage Pro
- Installation and Setup
- Processing Documents
- Basic Steps of OmniPage Pro OCR
- Selecting Process Commands
- Automatic Processing
- Bringing Document Images into OmniPage Pro
- Creating Zones on a Page
- Converting Images to Text
- Scheduling OCR
- Direct Input: Pasting Text into Other Applications...
- Working With Documents
- Exporting Documents
- OmniPage Pro Settings
- Customizing OCR
- Technical Information
- Glossary

Creating Zone Templates
110 - Customizing OCR
Creating Zone Templates
You can use a
zone template
to quickly and efficiently create zones on
documents that have the same zoning requirements. For example, if you
frequently process documents with layouts and content that require the
same type of zoning, you can create and save a zone template and apply
it to all such documents.
A zone template can have up to 64 zones. It remembers the size,
position, order, type, style and contents of zones.
To save a zone template:
1 Create the desired zones on a page image.
For more information, see Creating Zones on a Page on page
31.
2 Choose
Save Zone Template
... in the File menu.
The Save Zone Template dialog box appears.
3 Type a name for your file.
4 Click
Save
.
The zone template file is saved in the
Zone Templates
folder
within your installation folder.
To apply a zone template to a page:
1 Open the page image and make sure the Image View is active.
2 Select the zone template you want to use in the Zone button
pop-up menu in the AutoOCR toolbar.
3 Click the Zone button or choose the template name in the
Process menu.
OmniPage Pro creates zones on the page image according to
the selected zone template.