
7.0
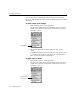

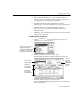
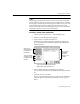
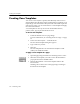
Table Of Contents
- Introduction to OmniPage Pro
- Installation and Setup
- Processing Documents
- Basic Steps of OmniPage Pro OCR
- Selecting Process Commands
- Automatic Processing
- Bringing Document Images into OmniPage Pro
- Creating Zones on a Page
- Converting Images to Text
- Scheduling OCR
- Direct Input: Pasting Text into Other Applications...
- Working With Documents
- Exporting Documents
- OmniPage Pro Settings
- Customizing OCR
- Technical Information
- Glossary

Specifying Zone Contents
Customizing OCR - 109
The Language Analyst may replace words in a zone with words that
contain characters outside an assigned zone contents file. For example,
the Language Analyst may insert an uppercase letter even if your zone
contents file specifies lowercase letters only. Deselect
Use Language
Analyst
in the
OCR
section of the Settings Panel if you do not want the
Language Analyst to override zone contents files.
To create a custom zone contents file:
1Choose
Edit Zone Contents File...
in the Settings menu.
2 Click
New
in the dialog box that appears.
3 Type a name for your file and click
New
.
The Edit Zone Contents dialog box appears. By default, the
new zone contents file contains the alphanumeric Macintosh
ASCII characters
.
4 Add or delete characters in the edit box as desired.
You can add any character from the Macintosh ASCII character
set.
5 Click
OK
when you are done.
The file is saved in the
Zone Contents
folder in your installation
folder. It appears automatically in the
Zone Contents
pop-up
menu.
You can type
and delete
characters
directly in this
edit box.
Click any of these
character groups
to add them to the
edit box.
Click any of
these characters
to add them to
the edit box.
Click to replace all characters with the
alphanumeric ASCII character set.