
7.0
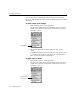

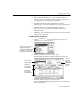
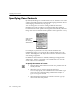
Table Of Contents
- Introduction to OmniPage Pro
- Installation and Setup
- Processing Documents
- Basic Steps of OmniPage Pro OCR
- Selecting Process Commands
- Automatic Processing
- Bringing Document Images into OmniPage Pro
- Creating Zones on a Page
- Converting Images to Text
- Scheduling OCR
- Direct Input: Pasting Text into Other Applications...
- Working With Documents
- Exporting Documents
- OmniPage Pro Settings
- Customizing OCR
- Technical Information
- Glossary

Specifying Zone Contents
108 - Customizing OCR
Specifying Zone Contents
By default, OmniPage Pro considers that a
Text
or
Automatic
zone could
contain all possible characters in the selected language character sets. To
select language character sets, see page 70.
You can change the
zone contents
setting to limit the characters
OmniPage Pro looks for within a zone during OCR. This setting is
located in the Zone Info palette which appears automatically when the
Image View is active. If the Zone Info palette is closed, press the z key.
For example, if a particular zone only contains numbers and
mathematical signs, you can specify the contents of that zone to be
Numeric
. OmniPage Pro will only look for numeric characters in that
zone during recognition.
In addition to the
All Characters
default, OmniPage is shipped with
Alphanumeric
,
Numeric
, and
Alphas
zone contents files. You can also
create custom zone contents files.
To specify the contents of a zone:
1 Click the Draw/Select Zones tool in the Tool palette if it is not
already selected.
2 Select the zone you want to specify by clicking it.
You can only specify zone contents for
Text
or
Automatic
type
zones. The zone contents setting is dimmed if a
Graphic
or
Ignore
zone type is selected.
3 Select the desired character set in the
Zone Contents
pop-up
menu in the Zone Info palette.
Zone contents
setting for
the currently
selected zone