OmniPage Pro for Macintosh CAERE CORPORATION 100 Cooper Court Los Gatos, California 95030-3321 European Offices: Caere GmbH Innere Wiener Strasse 5 81667 Munich Germany
Please Note In order to use this program, you should know how to work in the Macintosh environment. Please refer to your Macintosh documentation if you have questions about how to use menus, dialog boxes, scroll bars, and so on. OmniPage Pro for Macintosh Version 7 Copyright© 1996 Caere Corporation. All rights reserved. CAERE®, OmniPage®, OmniPage Pro®, AnyPage, True Page®, Language Analyst®, and 3D OCR® are trademarks of Caere Corporation.
Welcome Welcome to OmniPage Pro, and thank you for buying our software! The following documentation has been provided to help you learn about OmniPage Pro. This Users Manual This manual provides information on features and procedures. It includes an introduction to OmniPage Pro, installation and setup instructions, task-oriented instructions, ways to customize tools, settings guidelines, and technical information.
Using This Manual This manual is written with the assumption that you know how to work in the Macintosh environment. Please refer to your Macintosh users manual if you have questions about how to use dialog boxes, menus, scroll bars, and so on. The following conventions are used in this manual. Convention Purpose Italicized text Emphasizes menu commands, dialog box options, labeled buttons, and file names For example: Choose Open... in the File menu.
Chapter 1 Introduction to OmniPage Pro You probably do most of your business correspondence and other written projects on your computer. However, certain sources of information may not be immediately usable on a computer. For example, if you want to incorporate information from a magazine article into a document in your word processor, you somehow have to get the text from the article into your computer. Painstakingly retyping the article is not an appealing solution.
What Is Optical Character Recognition (OCR)? What Is Optical Character Recognition (OCR)? Optical character recognition (OCR) is the process of turning an image into computer-editable text. An image is an electronic picture of text such as a scanned paper document or an electronic fax file. Images do not have editable text characters; they have many tiny dots (pixels) that together form a picture of text. During OCR, OmniPage Pro analyzes an image and defines characters to produce editable text.
What Is Optical Character Recognition (OCR)? Basic Steps of OmniPage Pro OCR These are the basic steps of OmniPage Pros OCR process: 1 Bring a document image into OmniPage Pro. You can scan a paper document or load an image file. The resulting image appears in the Image View. See Bringing Document Images into OmniPage Pro on page 28 for more information. 2 Create zones to identify the parts of the document you want to recognize as text or retain as graphics.
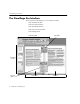
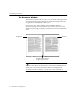
The OmniPage Pro Interface The OmniPage Pro Interface The main parts of OmniPage Pros user interface include: The AutoOCR Toolbar The Document Window The Thumbnail Window Zone Info and Tool Palettes The Settings Panel AutoOCR toolbar Tool Palette Thumbnail window Zone Info palette Image View Text View Document Window 8 - Introduction to OmniPage Pro
The OmniPage Pro Interface The AutoOCR Toolbar The AutoOCR toolbar contains buttons that can activate each step of the OCR process. Choose Show Toolbar in the Window menu to open the AutoOCR toolbar if it is closed. AUTO button The status line reports the current operation or the operation you can do next. Click the small arrow to show or hide the status line.
The OmniPage Pro Interface The Document Window The Document window allows you to view and work with pages in the current document. Original images are displayed in Image View and recognized text is displayed in Text View. Choose Image View in the Window menu (or am) to display a documents Image View and make it active. Choose Text View in the Window menu (or aj) to display a documents Text View and make it active. Image View Text View Drag this splitter to the left or right to resize a view.
The OmniPage Pro Interface The Thumbnail Window The Thumbnail window displays miniature pictures (thumbnails) of page images in the current document. You can use thumbnails to change pages, rearrange pages, and drag copies of images into other applications. Choose Show Thumbnails in the Window menu to open the Thumbnail window if it is closed. The thumbnail of the currently displayed page has a shaded background. The bars beneath each thumbnail indicate what has been done to the image.
The OmniPage Pro Interface Zone Info and Tool Palettes The Zone Info and Tool palettes are displayed when the Image View of a document is active. Choose Show Tool Palette in the Window menu (or press the t key) if the Tool palette does not appear when the Image View is active. Use the Tool palette to draw zones, modify zones, reorder zones, erase parts of the image, zoom in or out, and rotate the image.
The OmniPage Pro Interface The Settings Panel The Settings Panel is the central location of OmniPage Pro settings. You can click the Settings Panel button or choose Settings Panel in the Settings menu to open it. The Settings Panel has eight different sections of settings. Each section can be displayed by clicking its icon on the left. Click each icon to view and select different settings. Scroll to see more options. See Chapter 4, OmniPage Pro Settings, for more information on settings.
Getting Online Help Getting Online Help In addition to using this manual, you can use OmniPage Pros balloon help, online tutorial, and online reference guide to learn about features and procedures. These are available in the Guide menu after you install and launch OmniPage Pro. The Guide menu is located in the upper-right corner of your screen. Choose Show Balloons to display balloon help for items in the interface.
Getting Online Help OmniPage Pro Tutorial Choose OmniPage Pro Tutorial in the Guide menu to open an online tutorial for learning about OmniPage Pro features and procedures. Click the tutorial you want to do. Click the tutorial you want to do and then follow the directions that appear on screen. Red coach marks will help show you the steps to be performed. OmniPage Pro Guide Choose OmniPage Pro Guide in the Guide menu to get online reference information for features and instructions for common tasks.
Product Support Product Support For the fastest and easiest way to get help, please look for solutions in this manual or in the OmniPage Pro Guide . Product support and information are also available to registered users through the services listed in this table. Service How to Contact World Wide Web home page http://www.caere.
Chapter 2 Installation and Setup This chapter provides information on installing OmniPage Pro and selecting a scanner to use with it. Please also read the Release Notes and the Scanner Setup Notes included in your OmniPage Pro package. These provide the most up-to-date information concerning installation and setup issues.
System Requirements System Requirements To install and run OmniPage Pro, you need the following setup: Standard Macintosh (68020 or greater) or Power Macintosh System 7.0 or later (System 7.
Installing the Software Some versions of OmniPage Pro are designed only for customers upgrading from previous versions of Caere OCR software. To install these special upgrade versions, you may be prompted to enter the serial number of your previous product. To install OmniPage Pro: 1 Insert the OmniPage Pro CD-ROM in the CD-ROM drive. (Or, insert disk #1 in the disk drive.) 2 Double-click the installer icon and then click Continue . 3 Read the license agreement and then click Accept .
Installing the Software 6 Click the appropriate processor option. Click 680x0 if you have a 680x0 Macintosh. 7 Click PowerPC if you have a Power Macintosh. Click Universal if your computer can run as a 680x0 Macintosh or a Power Macintosh and you want to run OmniPage Pro in either configuration. Select the location where you want to install OmniPage Pro. OmniPage Pro Folder is the name of the default installation folder. 8 Click Install .
Selecting Your Scanner Selecting Your Scanner To use a supported scanner with OmniPage Pro, you must select a driver for it during installation. This gets installed as a Chooser extension which must be selected before scanning in OmniPage Pro. See the Scanner Setup Notes included in your OmniPage Pro package for more information on scanner support. Use the OmniPage Pro installer program to install additional Chooser extensions if you change scanners.
Starting OmniPage Pro Starting OmniPage Pro To start OmniPage Pro: 1 Open the OmniPage Pro Folder (or whatever installation folder you selected). 2 Double-click the OmniPage Pro 7.0 application icon. The first time you launch OmniPage Pro after installation, you are prompted to personalize your copy. 3 Type in the licensee and company name in the dialog box that appears. This information will appear in OmniPage Pros About box. 4 Click OK.
Registering OmniPage Pro To register OmniPage Pro by phone: 1 Choose Register OmniPage Pro in the Apple menu to open the Registration dialog box. This dialog box appears automatically the very first time you start OmniPage Pro and each time you start it after the first 20 unregistered sessions. 2 Select your country in the pop-up menu if it is not already selected. 3 Call the phone number listed to the right of your country. In the United States and Canada, you can call 24 hours a day.
Getting Started Getting Started See Chapter 1, Introduction to OmniPage Pro, to get an overview of OCR, an introduction to the OmniPage Pro interface, and ways to get online help. You can also do guided tutorial exercises to learn about OmniPage Pro features. Choose OmniPage Pro Tutorial in the Guide menu and click the tutorial you want to do. Click the tutorial you want to do.
Chapter 3 Processing Documents This chapter describes how to process documents in OmniPage Pro from start to finish. It explains the basic steps of OCR and provides instructions for other tasks you can do with your documents. There are different ways to accomplish the same tasks in OmniPage Pro. For example, you can use toolbar buttons or menu commands to start certain procedures. You can also have OmniPage Pro do certain OCR jobs automatically, or you can step through the jobs manually.
Basic Steps of OmniPage Pro OCR Basic Steps of OmniPage Pro OCR These are the basic steps of OmniPage Pro OCR: 1 Bring a document image into OmniPage Pro. See page 28 for more information. 2 Create zones to identify the parts of the document you want to recognize as text or retain as graphics. See page 31 for more information. 3 Perform OCR to convert text information into editable text characters. See page 40 for more information. 4 Export the document to the desired location.
Automatic Processing Automatic Processing You can use the AUTO button to process a new document from start to finish or finish processing an open document. The operations that occur when you click AUTO depend on the currently set Image, Zone, OCR, and Export commands. AUTO button For example, OmniPage Pro can automatically scan a stack of pages in a scanners automatic document feeder (ADF), create zones on all pages, recognize the pages, and then save them as a file.
Bringing Document Images into OmniPage Pro If a document is open, each unfinished page is finished in order. OmniPage Pro creates zones on any unzoned pages automatically or with a currently selected zone template. It then continues with the selected OCR operation. Auto Save and Auto Paste are the only Export commands that can be activated automatically. (Auto Paste is only available in Direct Input mode.
Bringing Document Images into OmniPage Pro 4 Click the Image button in the AutoOCR toolbar or choose Scan Image in the Process menu. Pages are scanned in order and the resulting images appear in the Image View. Scanned pages become your working document if a document is not currently open. If a document is currently open, the page images are added as new pages. Loading Image Files You can load TIFF and PICT image files into OmniPage Pro.
Bringing Document Images into OmniPage Pro 5 Click Load after you have selected all the files you want to load. Image files are loaded in the order selected and combined into one working document. If a document is currently open, the image files are added as new pages. Opening Documents You can open image files and OmniPage Documents using the Open command in the File menu. An OmniPage Document is a file that is saved in OmniPage Pros proprietary format.
Creating Zones on a Page An image file opens in the Image View. An OmniPage Document opens with its original image (if saved) in the Image View and recognized text (if any) in the Text View. Creating Zones on a Page Page images are displayed in OmniPage Pros Image View. This is where zones are created before OCR. Zones are bordered areas that identify parts of a page that will be recognized as text or retained as graphics. Any part of a page not enclosed by a zone is ignored during OCR.
Creating Zones on a Page Creating Zones Automatically OmniPage Pro can create zones automatically for you. To do so, it uses the selected zoning method to analyze the page and break it into ordered sections. To create zones automatically: 1 Set Auto Zones as the command in the Zone buttons pop-up menu. 2 Choose Settings Panel in the Settings menu and click the Zones icon. 3 Make sure the appropriate zoning method is selected for the page. OmniPage Pro uses this as a guideline for creating zones.
Creating Zones on a Page Automatic zone type: OmniPage Pro detects if the zone contains text or graphics. Any side-byside columns detected within a zone are treated as flowing text (starting from the top of the first column, going down the column, and then back up to the next column). Automatic zones have purple borders. Text zone type: OmniPage Pro treats all contents as one block of text; it does not detect graphics.
Creating Zones on a Page 2 Select the zone you want to identify by clicking it. Shift-click to select additional zones. Double-click the Draw/Select Zones tool or choose Select All in the Edit menu to select all zones on the current page. 3 Click the desired zone type in the Zone Info palette. If the Zone Info palette is closed when the Image View is active, press the z key. Automatic Text (use only for single columns and tables) Ignore Graphic The zone type will change accordingly.
Creating Zones on a Page To draw a rectangular zone: 1 Click the Draw/Select Zones tool in the Tool palette if it is not already selected. The mouse pointer in the Image View becomes a drawing tool. 2 Click the appropriate zone type in the Zone Info palette. Automatic Text (use only for single columns and tables) Ignore Graphic For example, click the Graphic type if you are going to draw the zone around a graphic such as a photo. See Specifying Zone Types on page 32 for more information.
Creating Zones on a Page You can use the Polygon tool to draw a zone one side at a time. This is useful for drawing non-rectangular zones. To draw a zone one side at a time: 1 Click the Polygon tool in the Tool palette. The mouse pointer in the Image View becomes a drawing tool. 2 Click the appropriate zone type in the Zone Info palette. Automatic Ignore Text (use only for single columns and tables) 3 Position the drawing tool where you want to start drawing the first side of the zone.
Creating Zones on a Page Modifying Zones Zones can always be modified before OCR takes place. You can move, copy, resize, reorder, extend, connect, divide, and delete zones. You can also reverse the black and white elements on a page image. See Inverting an Image on page 57 for more information. To move or copy zones: 1 Click the Draw/Select Zones tool in the Tool palette if it is not already selected. 2 Place the mouse pointer inside a zone.
Creating Zones on a Page 3 Click within the next zone you want recognized. The number 2 appears in the zone. 4 Continue until all the zones are appropriately ordered. If you do not number all the zones, they will be automatically numbered for you when you select another tool or start OCR. Unless you are using the True Page style set, the order of zones determines the order in which text will be placed on a recognized page. To extend an area of a zone: 1 Click the Modify Zones tool in the Tool palette.
Creating Zones on a Page To connect two or more zones: 1 Click the Modify Zones tool in the Tool palette. 2 Position the mouse pointer in one of the zones you want to connect. 3 Hold the mouse button down and drag the mouse pointer onto the zones you want to connect. 4 Release the mouse button when you are done. The zone border changes to display the modified zone area. To divide a zone: 1 Click the Modify Zones tool in the Tool palette.
Converting Images to Text Converting Images to Text Performing OCR on an image converts it to editable text. This is also referred to as recognizing text . After OCR, you can check for recognition errors and misspelled words before you export the text to another application.
Converting Images to Text Checking OCR Results Recognized text appears in the Text View after OCR so you can check for errors and misspellings in the text before exporting it to another application. Error checking starts automatically after OCR if you chose OCR & Check as the OCR command. You can select dictionaries and other error checking options in the Spelling section of the Settings Panel. See Spelling Settings on page 80 for more information.
Converting Images to Text 2 Select one of these options for the word: Click Ignore (or ai) to allow the word to remain as is. Click Ignore All to ignore all instances of the word. Click Change (or ac) to replace the word with the word in the Change to edit box. You can either type a word in the Change to edit box or select a word in the Suggestions pop-up menu. Click Suggest to have OmniPage Pro add new suggestions, if any, after you type a word.
Converting Images to Text Verifying Recognized Text You can compare recognized text against its original imageto make sure that text was recognized correctly. To verify text against its original image: 1 Make sure the Text View is active. 2 Hold down the Option key and double-click the word you want to verify. Or, select the word and choose Verify Text in the Edit menu. The Verification window opens and shows a clear close-up of the original word and its surrounding area in the image.
Converting Images to Text Getting Accuracy Statistics After OCR, you can choose Get Accuracy Info ... in the File menu to get a statistical report showing how well OmniPage Pro recognized the current page.
Scheduling OCR Scheduling OCR OmniPage Pro can perform OCR on documents while you are away from your computer. You can schedule OCR processing for up to 256 OmniPage Documents or image files. Scheduled documents will be opened, unfinished pages will be recognized, and the documents will be saved as specified. Choose Schedule OCR... in the Process menu to open the Schedule OCR dialog box.
Scheduling OCR Setting Up an Automatic Input/Output System If you regularly receive documents that need to be converted to text, such as fax files, you can set up an input/output system to facilitate OCR processing. You can specify an input folder that OmniPage Pro will check every 30 seconds. When files are detected in the folder, they are added to the processing queue and recognized after the specified time. Recognized files are then placed in the designated output folder.
Scheduling OCR Adding Individual Documents to the Schedule If you have documents that need to be converted to text, you can manually add them to the processing schedule. Files will be recognized after the specified time. Recognized files are then placed in the designated output folder. To add individual documents: 1 The Input File List displays all files in the processing queue. Choose Schedule OCR... in the Process menu. The Schedule OCR dialog box appears. Click Add Files...
Scheduling OCR Settings for Scheduled Files The following settings in the Schedule OCR dialog box are used for all files in the processing queue. When to Perform OCR Files in the processing queue are recognized in order after the specified time. Select Immediately to start recognizing scheduled jobs as soon as you click OK in the Schedule OCR dialog box. If OmniPage Pro is watching an input folder, it tries to recognize new files as soon as it detects them.
Direct Input: Pasting Text into Other Applications Default Output Options All newly scheduled files have the same default output folder and file format assigned to them. Click Set Output... to change the default options. The default file name is always the original file name with the word Output appended. You can change the output folder, output file format, and output file name for any scheduled document. To do so, select a file in the Input File List and click Modify .
Direct Input: Pasting Text into Other Applications Supported Applications Direct Input works with virtually any Macintosh application that supports pasting text from the Clipboard. However, your Macintosh must have enough memory to run OmniPage Pro and the application at the same time. Text formatting, such as bold and italics, is retained if you are pasting into an application that supports RTF information. Otherwise, only plain text will be pasted.
Direct Input: Pasting Text into Other Applications You do not need to open OmniPage Pro itself. 3 Place the cursor at the location in your document where you want to insert recognized text. 4 Choose OmniPage Direct Input in the Apple menu. OmniPage Pro opens in Direct Input mode. This adds a special Auto Paste command to the Export button of the AutoOCR toolbar. Auto Paste is only available in Direct Input mode. It is automatically selected when you activate Direct Input.
Working With Documents Working With Documents The Document window allows you to look at and work with pages in the current document. Choose Image View in the Window menu (or am) to display the Image View and make it active. Choose Text View in the Window menu (or aj) to display the Text View and make it active. Image View Text View Current page number Drag this splitter to the left or right to resize a view.
Working With Documents Resizing a Page View You can enlarge (zoom in) or reduce (zoom out) the view of a page displayed in the Image View or Text View. You can select a setting in the Document section of the Settings Panel that determines how the Text and Image Views are displayed. See page 81 for more information. To resize a page view: 1 Click the view (Text or Image) that you want to resize to make that the active view.
Working With Documents Changing Pages You can change pages in a document in the following ways. Click the thumbnail of the page you want to display. Choose Show Thumbnails in the Window menu to open the Thumbnail window if it is closed. The thumbnail of the currently displayed page has a shaded background. Click the forward or backward arrow buttons next to the current page number located along the bottom of the Document window. Choose Go to Page...
Working With Documents Reordering Pages You can reorder pages in a document by dragging their thumbnails to different positions in the Thumbnail window. Choose Show Thumbnails in the Window menu to open the Thumbnail window if it is closed. Click the thumbnail of the page you want to move and drag it above the desired page number. Deleting a Page You can delete a page from a document that has at least two pages. For example, you may want to delete a page that was poorly scanned.
Working With Documents Modifying Images You can modify an image when the Image View is active. Choose Image View in the Window menu (or am) to display the Image View and make it active. Rotating an Image You can rotate a page image when the Image View is active. For example, if a page is accidentally scanned upside down, you can correct the orientation by rotating it. If you need to rotate a page, be sure to do so before you create zones. All zones are deleted during page rotation.
Working With Documents If you do not want to permanently erase parts of the actual image, but want to omit areas of a page during OCR, identify the areas as Ignore zone types or do not include them in any zones at all. Inverting an Image OmniPage Pro cannot perform OCR properly on white text on a black background. To remedy this, you can invert an image (reverse the black and white elements) before OCR.
Working With Documents Formatting Text Use commands in the Format menu to apply font, font style, and font size formatting to selected text in your recognized document. Cutting or Copying Text or Graphics Choose Cut in the Edit menu to place selected text or graphics on the Clipboard. Cut items are removed from the Text View. Choose Copy in the Edit menu to place a copy of selected text or graphics on the Clipboard. Copied items are not removed from the Text View.
Working With Documents To print pages: 1 Make the view (Text or Image) from which you want to print active. 2 Choose Print Text... (or Print Images... ) in the File menu. The dialog box that appears depends on your printer. 3 Select print options for your document. If you are printing from the Image View, the dialog box displays the Scale Images to Fit Page option. Select this to ensure that each page image fits on one printed page. 4 Click Print to start the print job.
Exporting Documents Exporting Documents You can export original images or recognized text for use in other applications by: Saving a Document Copying a Document to the Clipboard Using Drag and Drop Functionality Sending Mail Saving a Document You can save recognized text, retained graphics, and original images to disk in a variety of file formats. Save your document as an OmniPage Document file or as an image file if you want to reopen it in OmniPage Pro again.
Exporting Documents 4 Select the appropriate file format for your document in the Format pop-up menu. The available file formats depend on the particular document you are saving. For example, if you are saving an unrecognized image, you can only save it as an OmniPage Document or an image file. See Supported File Formats on page 129 for more information. 5 Select the appropriate save option if you are saving the document in a file format other than OmniPage Document. 6 Click Save.
Exporting Documents Copying a Document to the Clipboard You can copy every page of recognized text to the Clipboard. The text can then be pasted directly into another application. You can also copy zones in the Image View to the Clipboard. Copying text to the Clipboard works best when you are copying just a few pages because some applications may not be able to paste very large amounts of text.
Exporting Documents Using Drag and Drop Functionality OmniPage Pro supports drag-and-drop functionality on System 7.5 (or later) and on systems that have it installed as a separate extension. Dragging Thumbnails You can drag a thumbnail from the Thumbnail window to the desktop or to another application that supports drag-and-drop functionality. The contents of a thumbnail is converted to a line-art PICT file with the same resolution as the original image.
- Processing Documents
Chapter 4 OmniPage Pro Settings This chapter describes the settings you can select in OmniPage Pro. Make sure that settings are appropriate for your document before you start processing it. You may have to experiment with different settings to get the results you want.
AutoOCR Toolbar Settings AutoOCR Toolbar Settings The AutoOCR toolbar buttons allow you to take a document through each step of the OCR process. You can set various commands in the popup menus beneath the Image, Zone, OCR, and Export buttons. Or, you can choose Process Settings in the Process menu and choose commands in the submenu. Image button Zone button OCR button Export button Pictures in the AutoOCR toolbar buttons and menu commands in the Process menu change as you set different commands.
AutoOCR Toolbar Settings Manual Zones Select Manual Zones to tell OmniPage Pro that you want to draw your own zones during automatic processing of a new document. OmniPage Pro pauses to let you draw zones. After drawing zones, click AUTO to continue with the selected operations. If a document is already open, you do not have to select this command to draw zones manually. Instead, just start drawing zones using the Tool palette. For more information, see Drawing Zones Manually on page 34.
AutoOCR Toolbar Settings Train OCR Select Train OCR to teach OmniPage Pro how to recognize special characters. For more information, see Training OCR for Special Characters on page 111. Export Commands You can set the following Export commands. Unless otherwise noted, the selected commands are activated by clicking the Export button or at the end of automatic processing. Save As Select Save As to save a document in a specified file format.
Selecting Settings Selecting Settings The Settings Panel is the central location of OmniPage Pro settings. To open it, click the Settings Panel button in the AutoOCR toolbar or choose Settings Panel in the Settings menu. The Settings Panel has eight sections of options. Each section can be displayed by clicking its icon on the left. Click each icon to view and select different Settings Panel options. Scroll to see more options.
Scanner Settings To select language character sets: 1 Choose Select Languages... in the Settings menu to open the Select Languages dialog box. Hold down the Command key (a) to select more than one language. 2 Select the appropriate language for the document you plan to recognize. Command-click to select more than one language. OmniPage Pro uses the character sets of the selected languages when it recognizes a page image. 3 Click OK to save your language selections.
Scanner Settings Page Size Options Select the dimensions of the pages you plan to scan in the Size pop-up menu. Select Letter for 8.5 by 11 inch pages. Select A4 for 21 by 29.7 cm pages. Select Legal for 8.5 by 14 inch pages. Orientation Options Select the orientation of the pages you plan to scan in the Orientation pop-up menu. Be sure to also load pages correctly in your scanner. Select Portrait for a vertically-oriented page. Select Landscape for a horizontally-oriented page.
Scanner Settings Brightness Options The brightness option for scanning a page is like the brightness setting used on a copy machine. This setting can compensate for variations in paper and print quality, so it can have a big influence on OCR accuracy. 3D OCR Select 3D OCR to get high-quality scanned images and the best OCR accuracy possible if you have a grayscale scanner. This technology uses the grayscale information on a page to view individual characters clearly and completely during OCR.
Image Settings Image Settings Click the Images icon in the Settings Panel to select options that affect how image files are loaded. To automatically open the Settings Panel to the Images section, Optionclick the Image button in the AutoOCR toolbar when it is set to Load Image. Grayscale TIFF Options If you load a grayscale TIFF file into OmniPage Pro, select an option that determines how grayscale information will be used during OCR. This must be selected before you load the file.
Zone Settings Select Flipped to load a page image and rotate it 180 degrees. Select Flipscape to load a page image and rotate it 90 degrees to the right. You can also rotate a page image after it is loaded into OmniPage Pro. For more information, see Rotating an Image on page 56. Zone Settings Click the Zones icon in the Settings Panel to select a zoning method for creating zones automatically. This tells OmniPage Pro how to look at the page layout and whether or not to look for graphics.
Zone Settings Automatic Select Automatic if you want OmniPage Pro to distinguish graphics from text and detect the text flow of side-by-side columns (either tabbed or flowing text). This setting works well with most types of documents. Automatic is recommended for newspaper articles and magazine pages. It is also the best setting if you are automatically processing many different types of documents at once.
OCR Settings OCR Settings Click the OCR icon in the Settings Panel to select input and output options that assist OmniPage Pro during recognition. To automatically open the Settings Panel to the OCR section, Optionclick the OCR button in the AutoOCR toolbar. (A document must be open for the button to be active.) Character Type Select the printed text characteristics of your document in the Character Type pop-up menu. Select Normal for conventionally printed text characters.
OCR Settings Automatically Correct Page Orientation If a page is oriented incorrectly in the Image View, it will not be recognized properly. Select Automatically Correct Page Orientation to have OmniPage Pro automatically correct an improperly oriented image by 90, 180, or 270 degrees during text recognition. This feature is only used for documents on which zones have been created automatically (and not manually modified). The Automatically Correct Page Orientation feature takes extra processing time.
OCR Settings Style Set Used When Creating Documents Select the style set you want to use whenever a new document is created in OmniPage Pro. A style set contains one or more zone styles that you can apply to zones before OCR. This is similar to applying styles to paragraphs in your word processor. During OCR, the selected styles specify how recognized text will be formatted. In addition to the style sets that are shipped with OmniPage Pro, any style sets that you create appear in the pop-up menu.
Direct Input Settings Direct Input Settings Click the Direct Input icon in the Settings Panel to select options for the Direct Input feature. Direct Input allows you to initiate OCR from the Apple menu and paste recognized text directly into another open application. See Direct Input: Pasting Text into Other Applications on page 49 for more information. Direct Input settings should be selected before you use the Direct Input feature because they influence what happens as soon as you use it.
Spelling Settings Spelling Settings Click the Spelling icon in the Settings Panel to select dictionaries and spell checking options. These settings are used by the Language Analyst during OCR and by the check-recognition process after OCR. Dictionaries Select dictionaries that are appropriate for the language in your document. Select a main dictionary in the Main Dictionary pop-up menu. OmniPage Pro is shipped with the main dictionary appropriate for your country.
Document Settings Document Settings Click the Document icon in the Settings Panel to select options for viewing and saving documents in OmniPage Pro. Document Window Settings Select an option for displaying views in the Document window. Select Automatically Adjust Selected View for Best Display if you want OmniPage Pro to determine the optimal size of the Text and Image View as you work. OmniPage Pro will activate and enlarge a view according to the current task.
Document Settings Automatically Open Thumbnail Window Select Automatically Open Thumbnail Window for New Documents if you want the Thumbnail window to open when you scan or load a brand new document into OmniPage Pro. The Thumbnail window displays miniature pictures (thumbnails) of page images in the current document. You can use thumbnails to change pages, rearrange pages, and drag copies of images into other applications.
Preference Settings Preference Settings Click the Preferences icon in the Settings Panel to select options for general OmniPage Pro operations. Select AUTO Button Finishes All Unrecognized Pages if you want OmniPage Pro to finish all pages in a document when you click the AUTO button. If this is deselected, the AUTO button will only finish the current page. The operations that occur during automatic processing depend on the currently selected commands in the AutoOCR toolbar.
Settings Guidelines Settings Guidelines The settings you select in OmniPage Pro can greatly affect OCR results. Make sure that settings are appropriate for your document before you begin processing. You may have to experiment with different settings to get the results you want. Answer the following questions to get settings recommendations for your documents.
Settings Guidelines What type of document are you processing? Magazine or newspaper article Recommendations: Select the appropriate page size and orientation in the Scanner section of the Settings Panel if you are scanning. Let OmniPage Pro create zones automatically. Select Automatic as the zoning method in the Settings Panel. See Creating Zones Automatically on page 32. Modify zones manually if auto zoning does not successfully create zones around all page areas you want to process.
Settings Guidelines What type of document are you processing? Memo or letter Recommendations: Select the appropriate page size and orientation in the Scanner section of the Settings Panel if you are scanning. Let OmniPage Pro create zones automatically. Select Single Column or Table as the zoning method in the Settings Panel. See Creating Zones Automatically on page 32. Draw zones manually around any graphics you want to retain. Identify them as Graphic zone types.
Settings Guidelines What type of document are you processing? Spreadsheet or table Recommendations: Select the appropriate page size and orientation in the Scanner section of the Settings Panel if you are scanning. Let OmniPage Pro create zones automatically. Select Single Column or Table or One Zone as the zoning method in the Settings Panel. See Creating Zones Automatically on page 32.
Settings Guidelines What type of document are you processing? Legal document Recommendations: Select the appropriate page size and orientation in the Scanner section of the Settings Panel if you are scanning. Draw zones manually around the page areas you want to retain. See Drawing Zones Manually on page 34. Omit unnecessary parts of the page. For example, do not include line numbers in a zone if you plan to renumber lines in your word processor.
Settings Guidelines What type of document are you processing? Mixed formats or not sure Recommendations: Select the appropriate page size and orientation in the Scanner section of the Settings Panel if you are scanning. Let OmniPage Pro create zones automatically. Select Automatic as the zoning method in the Settings Panel. See Creating Zones Automatically on page 32. Modify zones manually if auto zoning does not successfully create zones around all page areas you want to process.
Settings Guidelines What is the quality of the original document? Poor or not sure Degraded copies, colored or shaded backgrounds, runtogether or broken text characters Recommendations for scanning: Try to scan original documents rather than copies. Select 3D OCR in the Scanner section of the Settings Panel if you have a grayscale scanner and the page has run-together or broken text characters.
Settings Guidelines What is the quality of the original document? Good Clear, well-formed text characters on a clean, white background Recommendations: Select Manual Brightness in the Scanner section of the Settings Panel for the fastest processing if you are scanning. Use a setting near the middle of the scrollbar. well-formed text characters Deselect Use Language Analyst in the OCR section of the Settings Panel for faster processing.
Settings Guidelines How much formatting do you want to keep? None Keep plain text only Recommendations: Select Plain Format as the style set for the page. See Applying Styles to Zones on page 100. Save the recognized document as ASCII Text. Or, copy the text to the Clipboard and paste it into your target application. See Exporting Documents on page 60. Use the Direct Input feature to paste small amounts of text directly into another open application.
Settings Guidelines How much formatting do you want to keep? As much as possible Keep font characteristics, paragraph formatting, sideby-side columns, and graphic positioning Recommendations: Make sure all parts of the page are included within zones and identified as the correct zone type. See Specifying Zone Types on page 32. Select True Page as the style set for the page. See Applying Styles to Zones on page 100. Select the fonts you want mapped to various font types.
Settings Guidelines Do you want to retain graphics in your document? Yes Keep graphics such as logos and photos during OCR processing Recommendations: Select 3D OCR or Auto Brightness in the Scanner section of the Settings Panel if you are scanning with a grayscale scanner and you want grayscale graphics. If you have HP AccuPage selected as your scanner extension in the Chooser, you cannot retain grayscale graphics. Instead, select the HP Scan 2 extension in the Chooser.
Settings Guidelines Do you want to retain graphics in your document? No Ignore graphics such as logos and photos during OCR processing Recommendations: Do not draw any zones around graphic areas if you are drawing zones manually. Deselect Retain Graphics in the OCR section of the Settings Panel. Double-check that there are no zones around graphics before performing OCR.
Settings Guidelines How many languages are in your document? More than one language Recommendations for faster processing: Use this method if you have a dictionary for only one of the languages. 1 Deselect 3D OCR in the Scanner section of the Settings Panel if you are scanning a page. Deselect 3D OCR in the Images section of the Settings Panel if you are loading an image file. 2 Create zones around all areas that you want to recognize. See Creating Zones on a Page on page 31.
Settings Guidelines How many languages are in your document? More than one language Recommendations for more accurate processing: Use this method if you have dictionaries for all languages. 1 Create zones around areas of just one language. See Creating Zones on a Page on page 31. 2 Select the appropriate language character set and main and user dictionaries for that language. See page 70 for information on selecting languages. 3 Perform OCR on the document and save the text in the desired file format.
Settings Guidelines Are you processing a large document? Yes Recommendations if you have an automatic document feeder (ADF): Select Scan Until Empty in the Scanner section of the Settings Panel to scan a stack of pages at once. Otherwise, you must click the Image button to scan each subsequent page. Select Double-Sided Pages in the Scanner section of the Settings Panel to scan pages with print on both sides. You are prompted to turn the stack over when OmniPage Pro is ready to scan the other side.
Chapter 5 Customizing OCR OmniPage Pro has many features that allow you to customize the way your documents are handled during OCR. This chapter describes how to create and use these tools.
Applying Styles to Zones Applying Styles to Zones Much like applying styles to paragraphs in your word processor, OmniPage Pro allows you to apply styles to zones. During OCR, the selected styles specify how recognized text is formatted. A style set contains one or more zone styles . A zone style comprises formatting elements such as fonts, text flow, and indentation. Different zone styles can be applied to individual zones on a page.
Applying Styles to Zones Built-In Styles Sets OmniPage Pro is shipped with the following built-in style sets. These style sets cannot be deleted or modified. Only their font-mapping settings can be altered. True Page This style set retains as much text, paragraph, and page formatting as possible. It contains one style called Auto Detect which tries to discern all formatting automatically. True Page uses frames (formatting boxes) to retain the page layout of a document such as side-by-side columns.
Applying Styles to Zones You can use only one style set for a particular page in a document. However, different style sets can be used for different pages in the same document. To select a style set for a page: 1 Make the Image View of the page active. The Zone Info palette appears automatically if it is open. If it is closed, choose Show Zone Info Palette in the Window menu (or press the z key). 2 Select the desired style set in the Style Set for Page pop-up menu.
Applying Styles to Zones 2 Click the Draw/Select Zones tool in the Tool palette if it is not already selected. 3 Select the zone you want to specify by clicking it. Shift-click to select additional zones. Double-click the Draw/Select Zones tool or choose Select All in the Edit menu to select all zones on the current page. 4 Select the desired zone style in the Zone Style pop-up menu. Available styles depend on the style set selected for the current page.
Applying Styles to Zones To create a style set: 104 - Customizing OCR 1 Choose Edit Style Set... in the Settings menu A dialog box appears displaying all available style sets. 2 Click New. 3 Enter a name for your style set. For example, you could enter Memos as the name if you are creating a style set for memo-type documents. 4 Click New. The Edit Style Set dialog box appears. Auto Detect is the default style for every new style set. 5 Click New to add a new style to the style set.
Applying Styles to Zones 6 Enter a name for the style you want to add and click OK. For example, you could enter Heading as the name if you are creating a style for heading-type paragraphs. 7 Select the desired formatting attributes for the style. Repeat steps 57 to continue adding new styles to the style set. 8 Click OK when you are finished editing the style set. Style sets are saved in a folder called Styles within your installation folder.
Applying Styles to Zones 4 Change the formatting attributes for the style as desired. Click the button to the left of any formatting attribute if you want to turn on an auto-detect option. This tells OmniPage Pro to detect the formatting for you. 5 Repeat steps 3 and 4 to edit other styles. Click Delete to delete a selected style from the style set. Click Default to make a selected style the default style applied to all zones when a style set is first selected for a page.
Applying Styles to Zones Proportional Sans-Serif Character spacing varies depending on the character; letter strokes do not have finishing lines. The headings in this manual are an example of this font type. Monospaced Serif Character spacing is the same for each character; short lines finish off the letter strokes. &RXULHU is an example of this font type. Monospaced Sans-Serif Character spacing is the same for each character; letter strokes do not have finishing lines.
Specifying Zone Contents Specifying Zone Contents By default, OmniPage Pro considers that a Text or Automatic zone could contain all possible characters in the selected language character sets. To select language character sets, see page 70. You can change the zone contents setting to limit the characters OmniPage Pro looks for within a zone during OCR. This setting is located in the Zone Info palette which appears automatically when the Image View is active.
Specifying Zone Contents The Language Analyst may replace words in a zone with words that contain characters outside an assigned zone contents file. For example, the Language Analyst may insert an uppercase letter even if your zone contents file specifies lowercase letters only. Deselect Use Language Analyst in the OCR section of the Settings Panel if you do not want the Language Analyst to override zone contents files. To create a custom zone contents file: 1 Choose Edit Zone Contents File...
Creating Zone Templates Creating Zone Templates You can use a zone template to quickly and efficiently create zones on documents that have the same zoning requirements. For example, if you frequently process documents with layouts and content that require the same type of zoning, you can create and save a zone template and apply it to all such documents. A zone template can have up to 64 zones. It remembers the size, position, order, type, style and contents of zones.
Training OCR for Special Characters Training OCR for Special Characters You can create a training file for special characters that might normally be difficult to recognize. A training file is a set of up to 256 prerecognized text characters that OmniPage Pro compares with the characters it recognizes in a page image.
Training OCR for Special Characters Original character images are displayed along with OmniPage Pros interpretation of each character. Original image OmniPage Pros interpretation Most characters do not need to be trained. Look for uncommon characters, run-together text characters, or common errors. 5 Click any character you want to associate with the selected character 112 - Customizing OCR Double-click a character you want to train. Or select it and click Specify .
Training OCR for Special Characters 9 Click Save to save the specified characters to a training file. Or, click Append to add the specified characters to another training file. After saving or appending a file, you are asked if you want to make this the current training file. Click OK to recognize the current page using the training file you just created. Click Cancel to return to the image without recognizing it. Training files can be selected in the OCR section of the Settings Panel.
Training OCR for Special Characters 3 Double-click any character you want to associate with the specified character Double-click a character you want to edit. The Specify Character dialog box appears. Original Image of the specified character The currently associated character 114 - Customizing OCR 4 Edit the characters associated with the selected character as desired. You can type characters into the Character Code edit box or click a character in the scrolling list.
Creating User Dictionaries Creating User Dictionaries Dictionaries are used for recognition and error checking. A user dictionary is a personal dictionary that you build and customize. To customize a user dictionary: 1 Choose Edit User Dictionary... in the Settings menu. A dialog box lists all user dictionary files. 2 Do one of the following: User Dictionary is the default user dictionary Select a file and click Open to edit an existing user dictionary. Click New to create a new user dictionary.
Creating Custom Settings Files Or, click Export... to save your user dictionary as a text file. User dictionaries are saved in the Dictionaries folder within your installation folder. They can be selected in the Spelling section of the Settings Panel. Creating Custom Settings Files You can save customized settings to a settings file . A settings file contains Settings Panel and language selections. This is useful for quickly restoring OmniPage Pro to settings required by particular documents.
Creating Custom Settings Files To load settings: 1 Choose Load Settings... in the File menu. 2 Double-click the settings file you want to load. Settings Panel and language selections are changed according to the selected settings file.
- Customizing OCR
Chapter 6 Technical Information This chapter provides troubleshooting tips and other technical information about using OmniPage Pro. Please also read the Release Notes and Scanner Setup Notes that came in your OmniPage Pro package. These contain the latest information on OmniPage Pro and its supported scanners.
General Troubleshooting Solutions General Troubleshooting Solutions Although OmniPage Pro is designed to be easy to use, problems sometimes occur. Many of the onscreen error messages contain selfexplanatory descriptions of what to do check connections, quit other applications to free up memory, and so on. Sometimes that is all the troubleshooting help you need. Please see your Macintosh users manual for information on optimizing your system and application performance.
General Troubleshooting Solutions Low Memory Problems OCR is a CPU-intensive operation. The more memory you have, the better things will run. OmniPage Pro may run poorly under low memory conditions. You may be experiencing low-memory problems if you get out-of-memory messages, if OmniPage Pro works slowly, or if it accesses the hard disk a lot. Try these solutions for low memory conditions: Close other open applications and restart OmniPage Pro. Restart your Macintosh.
General Troubleshooting Solutions Increasing the Memory Partition OmniPage Pro and all other programs reserve a minimum amount of memory for their use. This is called the memory partition . If you get error messages about memory while using OmniPage Pro, try increasing the size of its memory partition to remedy the problem. If you increase any applications memory partition size, the amount of memory available for other applications is decreased when that application is running.
General Troubleshooting Solutions Low Disk Space Problems Problems may occur if your system runs low on free disk space. A minimum of 10MB free hard disk space is recommended when working with OmniPage Pro. More disk space is recommended if you work with lots of complex documents. To find out the amount of free hard disk space on your system: 1 Double-click your hard disk folder to open it. Make sure the folder is the active window. 2 Choose by Small Icon or by Icon in the Finders View menu.
Scanning Issues Scanning Issues Please look in the Scanner Setup Notes included in your OmniPage Pro package for detailed information about troubleshooting, setting up, and using supported scanners. Topics in this section include: Problems Connecting OmniPage Pro to Your Scanner Scanning Problems Scanning Tips You can also visit Caeres World Wide Web site at www.caere.com for updated scanner information and driver files.
Scanning Issues Make sure your scanner and any other device connected to the SCSI port of your Macintosh have unique SCSI ID numbers. The last SCSI device in the chain must be terminated properly if you have more than one device daisy-chained to the Macintosh SCSI port. Make sure the scanner is not in use by another application. Delete the Scanner Settings file from your System Folder and select your scanner in the Chooser again. Reinstall OmniPage Pro.
Scanning Issues Scanning Problems Try these solutions if a crash occurs during a scan: Check your scanner setup. See Problems Connecting OmniPage Pro to Your Scanner on page 124 for more information. Turn your scanner off and on again to return the scanner to its default state. Then restart your computer. Check with the scanner manufacturer to make sure you have the latest driver for your scanner. Resolve low memory problems. See Low Memory Problems on page 121 for more information.
OCR Problems OCR Problems For an overview of OCR, see page 6. This section contains information and solutions for possible OCR problems. Topics include: Crash During OCR Text Does Not Get Recognized Properly Problems With Fax Recognition Crash During OCR Try these solutions if a crash occurs during OCR or if processing takes a very long time: Check the quality of the image you are recognizing. See What is the quality of the original document? on page 90 for more information.
OCR Problems Select Use Language Analyst in the OCR section of the Settings Panel if your main dictionary matches the language of your document. The Language Analyst evaluates words and corrects likely errors during OCR. Train OmniPage Pro to recognize text characters that are not being recognized properly. See Training OCR for Special Characters on page 111 for more information. OmniPage Pro cannot recognize white text on a black background.
Supported File Formats Supported File Formats This section lists the supported import and export file formats along with some information on exporting. Import File Formats OmniPage Pro can open the following file formats. OmniPage Document PICT (type 2) TIFF Uncompressed TIFF Compressed (RLE/Huffman, ITU Fax Group 3 and 4, and PackBits) The minimum resolution of all image files must be 100x200 dpi. TIFF files can be binary or grayscale.
Supported File Formats If Your Applications File Format Is Not Listed If a file format for your application is not listed in the Save As dialog box, save your document in ASCII Text format. Most applications can open files saved in this format. (ASCII does not retain graphics or formatting.) If you have a newer version of an application than the one listed in the Save As dialog box, try using the older format. Newer applications can usually open files from older versions.
Apple Event Support Apple Event Support OmniPage Pro supports the four required Apple Events and a small set of custom Apple Events that allow you to automate recognition tasks. This section briefly describes all the Apple Events that OmniPage Pro supports. You can use Script Editor (a scripting editor that is part of Apples AppleScript package) to write scripts that control OmniPage Pro with Apple Events.
Apple Event Support jobs are recognized after jobs that were previously in the queue. OmniPage Pro checks this processing queue every 30 seconds and starts recognition as soon it detects a new job. Recognition of scheduled jobs cannot begin if you have a document open in OmniPage Pro. Use the get status call to check if there is a document currently open. See get status on page 135 for more information.
Apple Event Support Set output file takes as a parameter a string which specifies either a name or the full path name for the output file. A full path name for a file is made up of the volume name followed by a colon, the name of each of folder followed by a colon, and the file name. For example: +' 2PQL3DJH 3UR 7H[W)LOH. You should call this before any call to load and ocr or scan and ocr .
Apple Event Support You can scan and recognize multiple pages with this function if your scanner has an ADF. Make sure Scan until Empty is selected in the Scanner section of the Settings Panel. Scanned and recognized pages will be saved as one document. However, the Double-sided Pages setting is ignored when scanning with Apple Events because this option requires manual intervention. load and ocr file name or load and ocr {filename1, filename 2...
Apple Event Support If this call returns N$(-RE$GGHG7R4XHXH, that means a document is open in OmniPage Pro and the job cannot start until the document is closed.
Apple Event Support A Sample Script You can use Apples Script Editor to control OmniPage Pro via Apple Events. This is an example script to get you started. This script assumes you have a TIFF file called Test TIFF on your hard disk called HD. tell application "OmniPage Pro 7.
Glossary Terms 3D OCR® A technology developed by Caere that uses grayscale information to increase accuracy when recognizing scanned text characters. active window The window on the computer desktop where the next action will take place. ADF See automatic document feeder . AnyPage A technology developed and licensed by Caere that improves the combined performance of grayscale scanners and OmniPage Pro. AnyPage uses the quality of grayscale images to improve the recognition of scanned pages.
Glossary Terms dithering A dithering pattern is how a picture's gray areas are represented by black and white pixels. Different scanners offer a different choice of dithering patterns. dots per inch (dpi) The number of dots per linear inch that a printer can print or a scanner can scan. driver A program that manages the transfer of information between a computer and a peripheral device such as a scanner.
Glossary Terms Image View The area in OmniPage Pros Document window that displays the original page image and any zones that are drawn. Language Analyst® A Caere technology that uses information about language context and usage rules to evaluate text and correct likely errors during OCR. Words replaced by the Language Analyst appear in blue in OmniPage Pros Text View. manual zoning The process of manually drawing zones on a page image. mapping See font mapping .
Glossary Terms example, if OmniPage could not recognize the J in REJECT, and ~ is the reject character, the string RE~ECT would appear in your document. resolution The fineness with which a scanner, printer, or other device produces information. It is expressed in dots per inch (dpi) . In scanning, a higher dpi produces a sharper image. style See zone style . style set A setting that comprises a group of zone styles. text file A file containing information in text-only format.