
17.0


Workflow Assistant 89
At any moment in the process, the Assistant drop-down menu
offers all steps that are logically possible at that point.
In OmniPage 17 Professional, additional steps a
re available: Extract
Form Data and Mark Text.
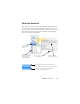
Creating workflows
Select New Workflow... in the Workflow drop-down list, or
from the Process menu. Or click the Workflow Assistant
button in the Standard toolbar when no workflow is selected.
The
opening Assistant panel offers two starting
points:
Choose Fresh Start
to begin with no steps in the workflow diagram
on the right. Accept or change the
default workflow name. Then
click Next and choose your first step. Choose an image loading step
that can take input from file, scanner or digital camera files. Specify
settings on the right. Then move on to build your workflow: it can
include a variety of different steps. When done, click Finish.
Choose Exist
ing W
orkflows to see a list of existing workflows.
These are the sample workflows plus any you have created. Select
one as source. Its steps will appear in the workflow diagram on the
right. Enter a name for your new workflow. Click Next to proceed;
modify its steps and settings as described in the next section. The
changed settings apply to the new workflow only and are not
written back to the workflow used as the source. Any changed
settings enter the new workflow, but do not affect the settings in
the program. Finally, select Finish to complete your new workflow.