
15.0
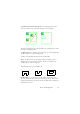


Table Of Contents
- Legal Notices
- Contents
- Welcome
- Installation and setup
- Using OmniPage
- Processing documents
- Quick Start Guide
- Processing methods
- Manual processing
- Processing with workflows
- Processing from other applications
- Processing with the Batch Manager
- Defining the source of page images
- Document to document conversion
- Describing the layout of the document
- Preprocessing Images
- Image Enhancement Tools
- Using Image Enhancement History
- Saving and applying templates
- Image Enhancement in Workflows
- Zones and backgrounds
- Table grids in the image
- Using zone templates
- Proofing and editing
- Saving and exporting
- Workflows
- Technical information
- Index

42 Chapter 3
Table grids in the image
After automatic processing you may see table zones placed on a
page. They are denoted with a table zone icon in the top left
corner of the zone. To change a rectangular zone to or from a
table zone, use its shortcut menu. You can also draw table type
zones, but they must remain rectangular.
You draw or move table dividers to determine where gridlines will
appear when the table is placed in the Text Editor. You can draw
or resize a table zone (provided it stays rectangular) to discard
unneeded columns or rows from the outer edges of a table.
Using the table tools you can insert row and column dividers;
move and remove dividers. Click the Place/Remove all dividers tool to
have dividers in a table auto-detected and placed.
You can specify line formatting for table borders and grids from a shortcut
menu. You will have greater choice for editing borders and shading in the
Text Editor after recognition.
Using zone templates
A template contains a page background value and a set of zones and their
properties, stored in a file. A zone template file can be loaded to have
template zones used during recognition. Load a template file in the
Layout Description drop-down list or from the Tools menu. You can
browse to network locations to load templates created by others.