
12.0

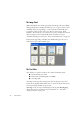

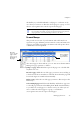
Table Of Contents
- Legal Notices
- Contents
- Welcome
- Installation and setup
- Introduction
- Processing documents
- Quick Start Guide
- Processing overview
- Automatic processing
- Manual processing
- Combined processing
- Processing with the OCR Wizard
- Processing from other applications
- Processing with Schedule OCR
- Defining the source of page images
- Describing the layout of the document
- Zones and backgrounds
- Table grids in the image
- Using zone templates
- Proofing and editing
- Saving and exporting
- Technical information
- Index

22 Introduction
The OmniPage Desktop
The OmniPage Desktop has a title bar and a menu bar along the top and
a status bar along the bottom. It has three main working areas, separated
by splitters: the Document Manager, the Image Panel and the Text
Editor. Each has close, maximize and restore buttons top right. The
Image Panel has an Image toolbar and the Text Editor has a Formatting
toolbar.
Standard toolbar
OmniPage
Toolbox
Thumbnails show a
picture of each page
in the document.
The current page
has an “eye” icon.
This page has been
recognized.
Page navigation
buttons
Buttons to show or hide the
Document Manager, Text
Editor and the Image
Panel’s thumbnails and
current page display. This
can also be done from the
View menu.
Image toolbar
Image Panel:
This is displaying the image of the current
page, together with its zones. The image
panel can display the current page,
thumbnails, or both.
Drag these splitters to
resize the working areas.
The Text Editor view
buttons offer three
formatting levels.
Text Editor:
This is displaying the
recognition results from the
current page in True Page
view.
Formatting toolbar