
11.0

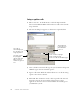
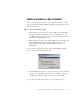


Table Of Contents
- Welcome
- 1 Installation and setup
- 2 Introduction
- 3 Tutorial: Processing documents
- Quick Start Guide
- Processing documents using the OCR Wizard
- Processing documents automatically
- Processing documents manually
- Processing a document automatically and finishing it manually
- Processing from other applications
- Processing documents with Schedule OCR
- Defining the source of page images
- Describing the layout of the document
- Manual zoning
- Table grids in the image
- Using zone templates
- 4 Proofing and editing
- 5 Saving and exporting
- 6 Technical information

MANUAL OMNIPAGE PRO 71
5 Saving and exporting
Once you have acquired at least one image for a document, you can
export the image(s) to file. Once you have recognized at least one page,
you can export recognition results to a target application by:
1.
Saving the recognition results to file.
2.
Copying recognition results to Clipboard.
3.
Sending results as one or more mail attachments.
The document remains in OmniPage Pro after export. This allows you to
save, copy or send it repeatedly, for example with different formatting
levels, using different file types, names or locations. You can also add or
rerecognize pages or modify the recognized text.
With automatic processing and using the OCR Wizard, you specify the
first saving destination before processing starts. When the last available
page is recognized (or proofread, if that was requested), the exporting
occurs.
You can specify export any time the program is not busy. If you ask to
export a document with unrecognized pages, you will be asked whether
they should be recognized first. If you answer No, only results from
recognized pages will be exported. If zones have been modified on
recognized pages, you will be invited to rerecognize those pages before
exporting.