
11.0

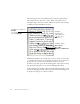
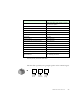
Table Of Contents
- Welcome
- 1 Installation and setup
- 2 Introduction
- 3 Tutorial: Processing documents
- Quick Start Guide
- Processing documents using the OCR Wizard
- Processing documents automatically
- Processing documents manually
- Processing a document automatically and finishing it manually
- Processing from other applications
- Processing documents with Schedule OCR
- Defining the source of page images
- Describing the layout of the document
- Manual zoning
- Table grids in the image
- Using zone templates
- 4 Proofing and editing
- 5 Saving and exporting
- 6 Technical information

CHECKING RECOGNIZED TEXT AGAINST ORIGINAL 61
5.
Color markers are removed from words in the Text Editor as they are
proofread. You can switch to the Text Editor during proofing to
make corrections there. Use the Resume button to restart proofing.
Click Close to stop proofreading before the end of the document is
reached.
C
HECKING
RECOGNIZED
TEXT
AGAINST
ORIGINAL
After performing OCR, you can compare any part of the recognized text
against the corresponding part of the original image, to verify that the
text was recognized correctly. Work as follows:
1.
Double-click any word in the Text Editor or select a word and choose
Verify Text in the Tools menu. The Verify Text window opens and
shows a picture of the original word and its surrounding area. Modify
the word in the Text Editor as necessary.
2.
Click inside the window to enlarge or reduce the picture. The picture
is enlarged on the first two clicks and reduced on the next two clicks.
3.
Continue double-clicking words that you want to verify, and
correcting them as necessary. The display changes as you select new
words.
Note
A page is marked with the proofed icons and in the
Document Manager if proofing ran to the end of the page.
Close button
This is the word
you double-
clicked in the
Tex t E d i t o r.
This is the
original image
of the word you
are verifying.