
11.0
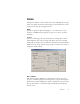
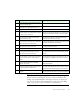
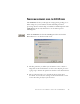
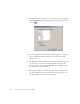
Table Of Contents
- Welcome
- 1 Installation and setup
- 2 Introduction
- 3 Tutorial: Processing documents
- Quick Start Guide
- Processing documents using the OCR Wizard
- Processing documents automatically
- Processing documents manually
- Processing a document automatically and finishing it manually
- Processing from other applications
- Processing documents with Schedule OCR
- Defining the source of page images
- Describing the layout of the document
- Manual zoning
- Table grids in the image
- Using zone templates
- 4 Proofing and editing
- 5 Saving and exporting
- 6 Technical information

34 TUTORIAL: PROCESSING DOCUMENTS
Q
UICK
S
TART
G
UIDE
This topic takes you step-by-step through the basic OCR process.
Loading and recognizing sample image files
You will find sample image files in the program folder, both single-page
and multi-page files. First try reading these files using the procedure
presented below, except for the references to a scanner. See Input from
image files for more information on acquiring the images. The results
provide you with a benchmark of the recognition quality you should
expect from your own files of comparable quality.
Next, try scanning a page from your scanner.
Scanning and recognizing a single page
Turn your scanner on and be sure it is working correctly. Choose a page
with good-quality clear text for this test.
We assume OmniPage Pro’s default settings are set and that your
document is in the language you specified for interface language during
installation. Open the Options dialog box from the Tools menu and
choose Use Defaults if you are not using the program for the first time.
You will process the document automatically and save the recognition
results to a file. You will proof the document but will not edit it inside
OmniPage Pro 11’s Text Editor.