
11.0
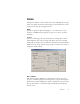
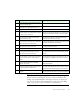
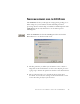
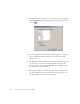
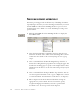
Table Of Contents
- Welcome
- 1 Installation and setup
- 2 Introduction
- 3 Tutorial: Processing documents
- Quick Start Guide
- Processing documents using the OCR Wizard
- Processing documents automatically
- Processing documents manually
- Processing a document automatically and finishing it manually
- Processing from other applications
- Processing documents with Schedule OCR
- Defining the source of page images
- Describing the layout of the document
- Manual zoning
- Table grids in the image
- Using zone templates
- 4 Proofing and editing
- 5 Saving and exporting
- 6 Technical information

SETTINGS 31
S
ETTINGS
The Options dialog box is the central location for OmniPage Pro settings.
It has seven panels. Context-sensitive help provides information on each
setting. In overview, the settings panels are:
OCR
Use this to specify recognition language(s), a user dictionary, a reject
character, an OCR method (optimize for speed or accuracy) and font
matching.
Scanner
Use this to define page size and orientation for scanning. You can also
make brightness and contrast settings and define options for scanning
multi-page documents, with or without an Automatic Document Feeder
(ADF). You can change scanner setup settings or install a new scanner or
change the default scanner.
Direct OCR™
This feature provides OCR services directly from your favorite word
processor or similar application. Use this panel to register and unregister
applications for Direct OCR and to enable or disable this service. You can
also specify automatic or manual zoning and whether proofreading is
desired or not.