
11.0
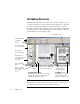
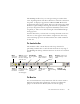
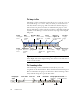

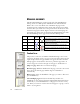

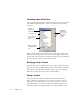
Table Of Contents
- Welcome
- 1 Installation and setup
- 2 Introduction
- 3 Tutorial: Processing documents
- Quick Start Guide
- Processing documents using the OCR Wizard
- Processing documents automatically
- Processing documents manually
- Processing a document automatically and finishing it manually
- Processing from other applications
- Processing documents with Schedule OCR
- Defining the source of page images
- Describing the layout of the document
- Manual zoning
- Table grids in the image
- Using zone templates
- 4 Proofing and editing
- 5 Saving and exporting
- 6 Technical information

26 INTRODUCTION
M
ANAGING
DOCUMENTS
The Document Manager is situated on the left of the OmniPage Pro
desktop. It has two tabbed panels: Thumbnail view and Detail view.
Click a tab to see its view. Both views summarize the pages in the
document and are synchronized: the current and selected pages remain
the same when you switch views. Our pictures show the two views with
the same four-page document. Pages 1 and 2 are selected and page 4 is
the current page, that is, the one shown in the Original Image area. The
Document Manager shows page status with the following icons:
Thumbnail view
This presents a vertical set of numbered thumbnail images, one for each
page in the document. Scroll to see pages as necessary. The current page has
a paler background and its page number text appears bold. You can select
multiple pages in the document; these have a ‘pushed-in’ appearance. A
status icon appears at the bottom right of each page as described above.
Jump to a page:
Click the icon of the desired page.
Reorder a page:
Click the thumbnail of the page you want to move and
drag it above the desired page number. Pages are renumbered
automatically.
Delete a page:
Select the thumbnail of the page you want to delete and
press the Delete key.
Select multiple pages:
Hold down the Shift key and click two
thumbnails to select all pages between and including them. Hold down
the Ctrl key as you click thumbnails to add pages to a selection one by
one. Then you can move or delete the selected pages as a group, or send
them to (re)recognition.
Page Status
Thumb-
nail icon
Detail
icon
Page image has been...
1 Acquired —
Acquired with no manual or template zones and has
not yet been recognized.
2 Zoned —
Acquired and manual or template zones have been
placed; not yet recognized.
3 Recognized
Recognized, but not proofread, or proofing was
interrupted on the page.
4 Proofed
Recognized, and proofing has reached the end of
the page.