
10.0


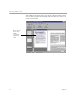
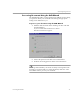
Table Of Contents

Converting Images to Text
20 Chapter 3
Automatic Processing
Use the AutoOCR toolbar in the OmniPage Toolbox to process a new
document from start to finish or to finish processing an open document.
To process your document automatically:
1 Click the AutoOCR tab in the OmniPage Toolbox to display the
AutoOCR toolbar.
2 Select processing commands in the AutoOCR toolbar:
• Set the desired Document Source command in the drop-down
list.
You can get an image into OmniPage Pro by scanning or by
loading a file.
• Set the desired Original Layout command in the drop-down
list.
Choose the option that best describes your original document
layout.
• Set the desired Output Format command in the drop-down
list.
Choose how much of your document’s original formatting
you want to keep.
• Set the desired Export Destination command in the drop-
down list.
You can save your document, send it as a mail attachment,
copy it to the clipboard for use in other applications, or have
OmniPage Pro read recognized text out loud.
3 Choose
Options
in the Tools menu and check that settings are
appropriate for your document. See Chapter 4, “Settings and
Commands,” for more information on Options settings.
4 Click
Start
or choose
Start
in the Process menu.
Each page of the document is processed and finished in order
according to the selected settings and commands.
The Manual OCR toolbar and the OCR Wizard are unavailable during
automatic processing. However, you can stop automatic processing by
clicking
Stop
in the AutoOCR toolbar, and switch to the Manual OCR
toolbar to finish processing your document manually, or click
Finish
in
the AutoOCR toolbar to finish processing your document automatically.