
8.0
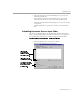
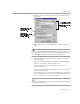
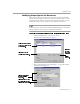

Table Of Contents
- Welcome
- Introduction to OmniPage Pro
- Installation and Setup
- Processing Documents
- OmniPage Pro Settings
- Customizing OCR
- Technical Information

Using Visioneer Scanners with OmniPage Pro
Technical Information - 89
Using Visioneer Scanners with OmniPage Pro
During installation, OmniPage Pro automatically integrates with your
Visioneer PaperPort software. However, you cannot scan directly into
OmniPage Pro if you use a Visioneer scanner or if your scanner is set up
to work with PaperPort software (such as the HP ScanJet 5s). Instead,
scan pages into PaperPort and then drag the page images onto the
OmniPage Pro icon at the bottom of the PaperPort Desktop. The page
images will be loaded into OmniPage Pro. See OmniPage Pro’s online
help for more information.
Supported File Formats
OmniPage Pro can open these file formats:
Caere Documents from version 6.0 and earlier can only be opened if the original
images were preserved.
TIFF files can be single- or multiple-page, line art or grayscale, compressed or
uncompressed. They can be 200, 300, 400 dpi, but 300 dpi is recommended.
OmniPage Pro stores and displays TIFF files as 300 dpi line art.
OmniPage Pro can save original images to these file formats:
Saving Image Files
OmniPage Pro saves each page of a multiple-page image separately.
If you select
Save all pages
in the Save Image dialog box,
Page#
is
appended to file names to distinguish separately saved pages. If you
select
Save each graphic zone to a file
, then
Zone#
is appended to file names
to distinguish separately saved graphic zones.
Bitmap (*.bmp ) OmniPage Document (*. met)
DCX (*.dcx) PCX (*.pcx)
JPEG (*.jpg) TIFF (*.tif)
Bitmap (*.bmp ) TIFF Uncompressed (*. tif)
OmniPage Document (*. met) TIFF Packbits (*.ti f)
PCX (*.pcx) TIFF Group 4 Compressed (*.tif)