
8.0
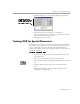
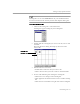
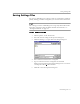

Table Of Contents
- Welcome
- Introduction to OmniPage Pro
- Installation and Setup
- Processing Documents
- OmniPage Pro Settings
- Customizing OCR
- Technical Information

Scheduling OCR
Customizing OCR - 80
Scheduling Individual Documents
You can schedule individual documents from different folders.
Scheduled documents are recognized at the specified time and then
saved in the designated output folder.
To schedule individual documents:
1 Choose
Schedule OCR...
in the Process menu.
The Schedule OCR dialog box appears.
2 Click
Add...
to open the Add Jobs dialog box.
3 Locate and select the files you want to add to the schedule.
You can select OmniPage Documents and supported image
files.
4 Click
Open
after selecting the desired files.
The Schedule OCR dialog box displays the newly added files.
OmniPage Pro starts
processing scheduled
documents, in order,
at the specified time.
Click
Add...
to add
documents
to the
processing
queue.
Click
Remove
to remove a
selected
document
from the
processing
queue.
All scheduled
documents are
displayed in this
processing queue.
Click this to modify
default output options.
Click
Advanced
to select
documents
from more
than one
folder.