
8.0

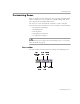

Table Of Contents
- Welcome
- Introduction to OmniPage Pro
- Installation and Setup
- Processing Documents
- OmniPage Pro Settings
- Customizing OCR
- Technical Information

Customizing Zones
Customizing OCR - 70
To connect two or more zones:
1 Click the Add to Zone button.
The mouse pointer in the image viewer becomes a drawing tool
with a plus sign.
2 Hold the mouse button down and drag the drawing tool over
the area where you want the zones to be connected.
3 Release the mouse button when you are done.
The zone border changes to display the modified zone area.
To divide a zone:
1 Click the Subtract from Zone button.
The mouse pointer in the image viewer becomes a drawing tool
with a minus sign.
2 Hold the mouse button down and drag the drawing tool over
the area where you want to divide the zone.
3 Release the mouse button when you are done.
The zone border changes to display the modified zone area.
Deleting Zones
You can delete the current zones if you want to create new zones. You
can also delete individual zones that you do not want to process during
OCR. Any part of a page image not enclosed by a zone is ignored during
OCR.
To delete and replace the current zones automatically, click the Zone
button. You will be prompted to replace the current zones.
To delete zones:
1 Select the zone you want to delete by clicking inside the zone.
• Shift-click to select additional zones.
• Choose
Select All
in the Edit menu to select all zones on the
current page.
Selected zones are shaded.
2 Press the Delete key or choose
Clear
in the Edit menu.
The selected zones disappear.