
8.0

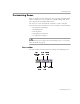
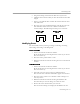

Table Of Contents
- Welcome
- Introduction to OmniPage Pro
- Installation and Setup
- Processing Documents
- OmniPage Pro Settings
- Customizing OCR
- Technical Information

Customizing Zones
Customizing OCR - 67
5 Drag the drawing tool to form the first side of your zone.
6 Click the mouse button when you have drawn the desired line
length.
7 Draw a perpendicular line in either direction to form the next
side of the zone.
8 Repeat steps 6 and 7 to finish drawing each side of your zone.
You will not be allowed to draw a line if it constitutes a
restricted shape. The following zone shapes are restricted:
Modifying Zones
You can modify zones by moving, resizing, reordering, extending,
subtracting, connecting, or dividing them.
To move zones:
1 Deselect the buttons in the Zone toolbar.
(If one of the first two drawing buttons is selected, you do not
have to deselect it.)
2 Place the mouse pointer inside a zone.
3 Hold down the mouse button and drag the zone to the desired
location.
To resize zones:
1 Deselect the buttons in the Zone toolbar.
(If one of the first two drawing buttons is selected, you do not
have to deselect it.)
2 Select the zone you want to resize by clicking inside it.
The selected zone is shaded and handles appear on its border.
3 Place the mouse pointer over a handle so that it changes to a
two-way arrow.
4 Hold down the mouse button and drag the handle in the
direction that you want to enlarge or reduce the zone.
5 Release the mouse button when you are done.
The zone border changes to display the modified zone area.
Indented along
the top
Indented along
the bottom