
8.0

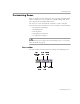
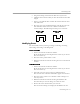

Table Of Contents
- Welcome
- Introduction to OmniPage Pro
- Installation and Setup
- Processing Documents
- OmniPage Pro Settings
- Customizing OCR
- Technical Information

Customizing Zones
Customizing OCR - 66
Drawing Zones Manually
You can draw zones manually on a page image using buttons in the
Zone toolbar. Rectangular zones are the most common, but you can also
draw irregular-shaped zones.
To draw rectangular zones:
1 Click the Zone Properties button and select the zone type and
content for the zone you are about to draw.
See “Changing Zone Properties” on page 71 for more
information.
2 Click the Draw Rectangular Zones button.
The mouse pointer in the image viewer becomes a drawing
tool.
3 Enclose an area of the image you want as a zone by holding
down the mouse button and dragging the drawing tool to form
a rectangular box.
Try to keep areas of text, such as paragraphs or single columns,
together in the same zone.
4 Release the mouse button when you are done.
A number appears within the zone indicating its processing
order.
5 Repeat steps 3 and 4 until you have finished drawing zones
around the desired areas of the page.
You cannot draw overlapping zones. If you attempt to draw a zone
over an existing zone, the borders of the new zone will wrap
around
the boundaries of the existing zone.
To draw irregular-shaped zones:
1 Click the Zone Properties button and select the zone type and
content for the zone you are about to draw.
See “Changing Zone Properties” on page 71 for more
information.
2 Click the Draw Irregular Zones button.
The mouse pointer in the image viewer becomes a drawing
tool.
3 Position the drawing tool where you want to start drawing the
first side of the zone.
4 Click the mouse button once.