
8.0
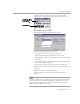
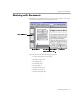

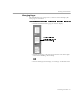
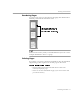

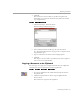
Table Of Contents
- Welcome
- Introduction to OmniPage Pro
- Installation and Setup
- Processing Documents
- OmniPage Pro Settings
- Customizing OCR
- Technical Information

Checking OCR Results
Processing Documents - 32
To verify text against its original image in Microsoft Word:
1 Follow steps 1 and 2 in the preceding instructions if your
document is not already open in Microsoft Word.
2 Select a suspect word.
Suspect words are marked in the color that was selected in the
Microsoft Word
section of OmniPage Pro’s Options dialog box.
You can only verify words that are marked as suspected errors.
However, once the Verify Text window is open, you can use its
scroll bars and zoom buttons to see any part of the original image.
3 Choose
Verify Text...
in the OmniPage menu.
The Verify Text window opens and shows a picture of the
original word and its surrounding area.
4 Repeat steps 2 and 3 to continue checking other suspect words.
The window display changes as you select new words.
5 Choose
Close Image Viewer
in the OmniPage menu to close the
window when you are done.
Removing OmniPage Pro Data from the Word Document
After checking for OCR errors, you should remove OmniPage Pro data
from your document to reduce its file size. You are automatically
prompted to remove OmniPage data after all suspect words have been
checked. You can also choose
Remove Check Recognition Support
in the
OmniPage menu. The OmniPage menu, toolbar, color markers, and
image data will all be removed from the document.
Use these buttons
to zoom in or out
on the image.