
8.0
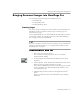
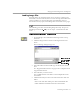

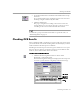
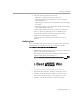
Table Of Contents
- Welcome
- Introduction to OmniPage Pro
- Installation and Setup
- Processing Documents
- OmniPage Pro Settings
- Customizing OCR
- Technical Information

Checking OCR Results
Processing Documents - 30
Checking OCR Results in Microsoft Word
You can check for OCR errors directly in Microsoft Word 7 or Microsoft
Word 97 if you have those versions installed on your computer.
To enable this feature, you must select settings in the
Microsoft Word
section of OmniPage Pro’s Options dialog box. See “Microsoft Word
Settings” on page 53 for more information.
Make sure the
*.doc
file extension is associated with the version of
Word you plan to use. Please refer to your Windows documentation for
more information on associating file extensions with applications.
To check and correct errors in Microsoft Word:
1 Perform OCR on your document and then save it as the
appropriate file type:
• Save as
Word for Windows 7.0
if you are using that version.
• Save as
Word 97
if you are using that version.
2 Open the document in Microsoft Word.
The document must be opened on a system that has OmniPage Pro
installed.
An OmniPage menu appears in Microsoft Word’s menu bar
along with a corresponding toolbar:
3 Choose
Check Recognition...
in the OmniPage menu.
Check
Recognition
Remove Check
Recognition Support
Verify Text
Close Image Viewer