
8.0
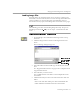

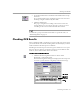
Table Of Contents
- Welcome
- Introduction to OmniPage Pro
- Installation and Setup
- Processing Documents
- OmniPage Pro Settings
- Customizing OCR
- Technical Information

Checking OCR Results
Processing Documents - 28
3 Set
OCR and Check
as the command in the OCR button’s drop-
down list.
Or, set
Perform OCR
as the command if you do not want error
checking to begin automatically after OCR.
4 Click the OCR button.
The page is recognized according to the current zones and
settings. If there are no zones on the page, zones are created
according to the current command in the Zone button.
To schedule a group of documents for OCR at a particular time, see
“Scheduling OCR” on page 79.
Checking OCR Results
After performing OCR, recognized text appears in the text viewer where
you can check for errors. Error checking starts automatically if you chose
OCR and Check
as the OCR process command.
OmniPage Pro marks suspected errors in green and inserts a red “reject”
character for any character it cannot recognize. To turn off these color
markers, choose
Show Markers
in the View menu.
To check and correct errors:
1 Click the Check Recognition button or choose
Check
Recognition...
in the Tools menu.
The Check Recognition dialog box displays the first suspected
error and a picture of how it originally looked in the image.
Click in this
window to
enlarge or
reduce the
picture.