
7.0

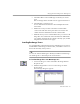


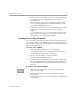
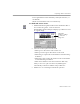
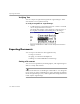
Table Of Contents
- Welcome
- Introduction to OmniPage Pro
- Installation and Setup
- Basic Procedures
- Settings Guide
- Technical Information

Creating Zones for OCR
3-12 Basic Procedures
4 Enclose an area of the image you want as a zone by holding the
mouse button down and dragging the mouse to form a
rectangular box.
Try to keep areas of text, such as paragraphs, together in the
same zone. Each zone displays a number indicating its order
and a letter indicating its zone type.
5 Repeat steps 3–4 until you have finished drawing zones around
each area that you want to recognize as text or retain as a
graphic.
Do not overlap zones; areas on a page should not be enclosed
by more than one zone. Any area of the page image that is not
enclosed by a zone is ignored during OCR.
Creating Zones Using a Template
You can create zones by applying a previously created zone template. A
zone template contains zone attributes such as size, position, order, and
zone type. This is useful if you frequently process documents that have
similar layouts and content.
To save a zone template:
1 Manually draw the desired zones on a page image.
(Automatically-drawn zones cannot be saved as a template.)
See “Creating Zones Manually” on page 3-11.
2 Choose
Save Zone Template
... in the Tools menu.
The New Template dialog box appears.
3 Type a name for your file in the
File Name
text box and click
OK
.
The zone template file is saved in the data folder within your
installation folder. It can be selected in the Zone button drop-
down list.
To create zones with a template:
1 Select the zone template that you want to use in the Zone
button drop-down list.
2 Click the Zone button or choose the template name in the
Process menu.
OmniPage Pro draws zones on the page image according to the
zone template.