
10.0
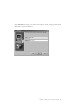
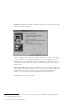

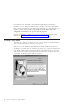
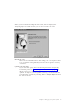
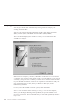
Table Of Contents
- Contents
- Welcome to ViaVoice
- Chapter 1. Setting up your speech system
- Chapter 2. The magic of dictating with ViaVoice
- Chapter 3. Introducing VoiceCenter
- Chapter 4. Dictating into SpeakPad
- SpeakPad menus and buttons
- General hints and tips
- Dictating numbers in the US English version of ViaVoice
- Dictating numbers in the UK English version of ViaVoice
- Dictating numbers in number mode
- Spelling words in spell mode
- Saying commands while dictating
- Dictating e-mail user IDs and URLs
- Transferring your dictation to another application
- Saving your dictation in SpeakPad
- Finding new words in your document
- Chapter 5. Dictating into Microsoft Word
- Installing Word Program Support
- Try your first dictation into Word
- ViaVoice menus and buttons in Word
- Using natural commands
- General hints and tips
- Dictating numbers in the US English version of ViaVoice
- Dictating numbers in the UK English version of ViaVoice
- Dictating numbers in number mode
- Spelling words in spell mode
- Saying commands while dictating
- Dictating e-mail user IDs and URLs
- Saving your dictation
- Finding new words in your document
- Chapter 6. Correcting your dictation
- Chapter 7. What Can I Say
- Chapter 8. Using the Internet
- Chapter 9. Customizing ViaVoice
- Changing VoiceCenter's appearance
- Changing the microphone's startup state
- Creating additional voice models
- Selecting a vocabulary or topic
- Changing the active vocabulary to improve performance (UK English version only)
- Adding a user
- Making a user name the current user
- Backing up and restoring user data
- Deleting a user name or voice model
- Setting dictation options
- Changing the appearance of the Correction window
- Enabling command sets
- Setting Text-To-Speech options
- Adjusting recognition sensitivity
- Chapter 10. Creating macros
- Chapter 11. Getting help
- Appendix A. Frequently used commands in dictation
- Appendix B. Notices
- Glossary
- Index

Analyzing your voice
After selecting Record my voice and clicking Next, ViaVoice displays the
Choosing a Story window. Select the story that you want to read aloud for
analyzing your voice. If the story you want has two Parts, select Part 1 first.
Read the story aloud using your normal speaking voice.
When ViaVoice has enough recorded data, you will see the Story Finished
window. Click Analyze to have ViaVoice create your voice model. However, if
you have a strong regional accent, we recommend that you click Continue
Reading so that you can record more sentences, giving ViaVoice more data for
analysis. Doing everything you can to give ViaVoice as much information
about your voice as possible is one of the best ways to ensure excellent
recognition accuracy.
10 ViaVoice for Windows Standard Edition