
10.0


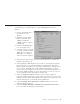


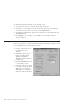
Table Of Contents
- Contents
- Welcome to ViaVoice
- Chapter 1. Setting up your speech system
- Chapter 2. The magic of dictating with ViaVoice
- Chapter 3. Introducing VoiceCenter
- Chapter 4. Dictating into SpeakPad
- SpeakPad menus and buttons
- General hints and tips
- Dictating numbers in the US English version of ViaVoice
- Dictating numbers in number mode
- Spelling words in spell mode
- Saying commands while dictating
- Dictating e-mail user IDs and URLs
- Transferring your dictation to another application
- Saving your dictation in SpeakPad
- Finding new words in your document
- Chapter 5. Dictating into Microsoft Word
- Installing Word Program Support
- Try your first dictation into Word
- ViaVoice menus and buttons in Word
- Using natural commands
- General hints and tips
- Dictating numbers in the US English version of ViaVoice
- Dictating numbers in number mode
- Spelling words in spell mode
- Saying commands while dictating
- Dictating e-mail user IDs and URLs
- Saving your dictation
- Finding new words in your document
- Chapter 6. Correcting your dictation
- Chapter 7. What Can I Say
- Chapter 8. Using the Internet
- Chapter 9. Customizing ViaVoice
- Changing VoiceCenter's appearance
- Changing the microphone's startup state
- Creating additional voice models
- Selecting a vocabulary or topic
- Adding a user
- Making a user name the current user
- Backing up and restoring user data
- Deleting a user name or voice model
- Setting dictation options
- Changing the appearance of the Correction window
- Enabling command sets
- Setting Text-To-Speech options
- Adjusting recognition sensitivity
- Chapter 10. Creating macros
- Chapter 11. Getting help
- Appendix A. Getting technical support
- Appendix B. Frequently used commands in dictation
- Appendix C. Notices
- Glossary
- Index

Changing the microphone’s startup state
Set the behaviour of the microphone at the At Startup tab in ViaVoice
Options.
1. Display VoiceCenter if it is
not already on your
desktop.
2. Click the ViaVoice menu
button, and select User
Options > ViaVoice
Options. ViaVoice Options
is displayed.
3. Click the At Startup tab if
it is not already on top.
4. Select the options you want
to change on this tab. Click
Apply to save changes or
click OK to save changes
and close ViaVoice Options.
5. Select the microphone state you want when VoiceCenter is started. The
default is Microphone off.
6. Select the Press to talk check box if you wish to activate the microphone
by pressing keys on your keyboard instead of clicking the microphone
button. (These shortcut keys are sometimes called hotkeys.) Then press the
key you want. The CTRL key will be added automatically if you press
only one key. For example, if you press M, you’ll turn the microphone on
by pressing CTRL+M. When you press this hotkey, you can say only one
voice command, then the microphone will turn off.
7. Select the Toggle microphone check box if you wish to toggle the
microphone state by pressing a hotkey. Then press the key you want. The
CTRL key will be added automatically. For example, if you press M, you’ll
turn the microphone on and off by pressing CTRL+M.
8. Select the Display agent during text-to-speech check box to have the
animated character appear.
9. Select the Display Recognition Wizard when problems detected check
box to have this wizard appear automatically.
Chapter 9. Customizing ViaVoice 75